BIRCH Return to BIRCH
updated September 3, 2024

  Thinlinc Desktop Client


MULTIFACTOR AUTHENTICATION (MFA) NOW REQUIRED FOR ALL CAMPUS LOGINS

Use of University computers and systems now requires 2-factor authentication. This means that after you type your password, a confirmation message will be sent to your phone, which requires an app. See Set up MFA for instructions.


The Cendio Thinlinc client is a program that gives you a full Unix desktop on a PC. It is available on all Windows workstations in Open Area IST labs across campus. It can also be downloaded for Mac, Windows or Linux from CCL servers at https://ithelp.umanitoba.ca/a/1680514-cendio-thinlinc-client or from the Cendio web site at http://www.cendio.com.


0. If you have never used the campus Linux system before, you MUST activate your Linux access using signUM (https://signum.umanitoba.ca) before proceeding to step 1.

After logging into signUM, choose "Request Access - Request for Self". Under Categories, select IPA(Unix/Linux Access) and Add to Cart.  Click on the Next button to go to the next page. Finally, click on Submit to submit your request. You should be able to login to Linux within 10 min. of saving your settings.

Note: If you have not changed your password in the last 12 months, be prepared to enter a new password when logging into signUM. You will not be allowed to proceed until you have put in a new password.


1.  If you are off campus, you need to connect to the campus VLAN using Pulse VPN. CCL can only be reached on the campus network backbone.

Students in PLNT2530, PLNT3140, PLNT4610 and PLNT7690 will automatically have VPN access by the first week of classes. Others must send a request to IST for VPN access.


2. Launch the Thinlinc Client

On your own computer, start the Thinlinc client from the Start menu on Windows, or from Applications on Mac.

In IST-managed computer labs, the Thinlinc client is already installed
Start --> Programs --> Thinlinc --> Thinlinc Client.


3. Enter your userid and password

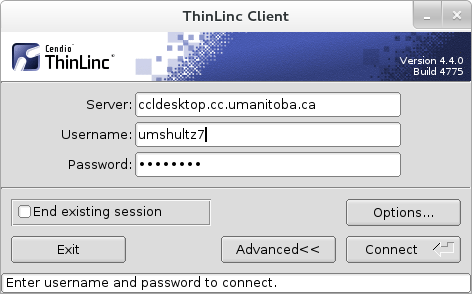
Type in 'ccldesktop.cc.umanitoba.ca' as the server. ccldesktop redirects you to one of five Linux servers, gaia, mars, mercury, jupiter or venus.

Type in your userid and password, and click on "Connect"

Usually, your userid is the part of the email address before the '@' symbol. eg. umshultz7. However, for many students, Thinlinc requires your full U of M email address eg. umschultz7@myumanitoba.ca. Use whichever one works as the Username.

Your screen will switch to a desktop session running on one of the CCL Linux login hosts.


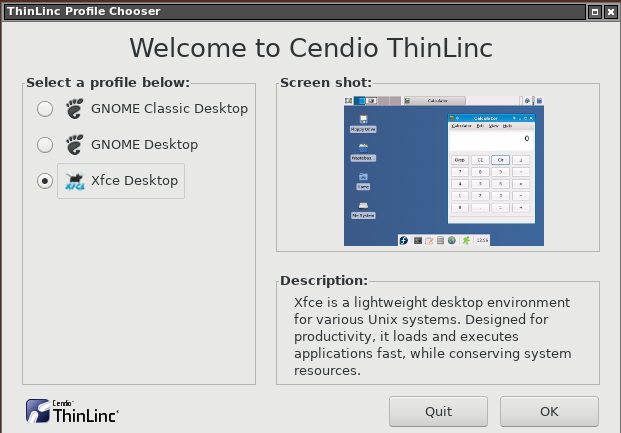
Three desktop environments are available on the CCL system.

Since these tutorials assume you are using the Xfce Desktop, select "Xfce Desktop" in the Thinlinc Welcome menu and click OK.


4. Switching between Thinlinc and your local desktop

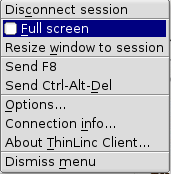
By default, your Linux screen fills the entire display. At any time during your Fullscreen session you can bring up the Thinlinc menu by pressing F8* at the top of the keyboard. The menu will pop up. Change to single window mode by unchecking "Full screen", as shown at right.

Your thinlinc session will now be enclosed in a window, which can be minimized (_) if you wish to work on your Windows/Mac screen.

To return to a full-screen session, move your mouse into the thinlinc window and press F8 again, and check the "Full screen" box.

*On some keyboards, you may need to hold down the Fn key, and press F8.


5. Ending your session.

Don't forget to logout from your Linux session

Step 1 - Logout from Linux

System --> Log Out. Next, quit Thinlinc.

Step 2 - Logout from Windows

Logout from the Windows workstation.

If you wish to stop working but leave your session running, simply close the Thinlinc window using the 'X' button. The next time you run Thinlinc regardless of which computer you are logging in from, your desktop will reappear with all windows where they were on the screen. One potential problem is if you move to a computer with a different screen resolution.Thinlinc will try to resize the screen to match the resolution of your monitor.

6. Disconnecting from a session, to be resumed later

Often, you are in the middle of a project with lots of windows open on your screen, but want to stop until a later time. Thinlinc makes it possible to disconnect from a session and reconnect to that session later, with everything still on the screen as you left it.

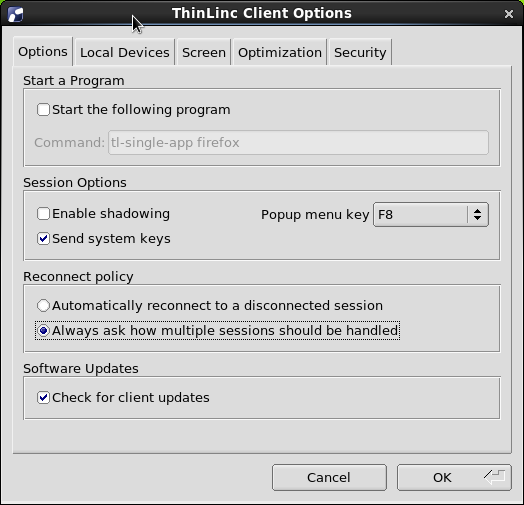
The best way to ensure that you can reconnect to a previously disconnected session is to open the Options menu in the Thinlinc Client, and, under Reconnect Policy, check the box that says "Always ask how multiple sessions should be handled.


Now if you wish to disconnect from a session, press F8 and choose "Disconnect session".

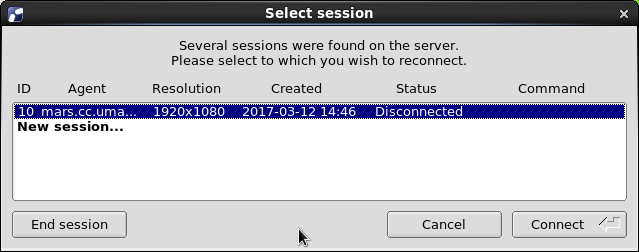
The next time you log into the host, you will see a list of sessions currently running on that host.

Choose the session you wish to connect to and click on "Connect".


Notes:
1) It is a bad idea to leave a Thinlinc session running permanently. Idle sessions still take up disk space and system overhead. The best practice is to logout when you are done, unless you have a particular reason to disconnect and leave a session running.
2) Some applications should not be run on two sessions simultaneously. In particular, Firefox and LibreOffice should only run on one session at a given time.


Thinlinc FAQ

Downloading the Thinlinc client for your personal computer

You can download Thinlinc for use on your own computer at https://ithelp.umanitoba.ca/a/1680514-cendio-thinlinc-client or from the Cendio web site at http://www.cendio.com.

Can I log into a specific server using Thinlinc?

Server must be set to ccldesktop.cc.umanitoba.ca. While it may seem intuitive to choose a specific login host such as mars.cc.umanitoba.ca, the IST configuration doesn't allow that.

My session was idle for a long time, and now all I see is a black screen that doesn't respond to the mouse. How can I return to my session?

Press F8 to get the menu, and choose Disconnect Session. Next, login using the Thinlinc client. You can choose to connect to your session, which will be displayed in the Select Session window.

Thinlinc defaults to a different language than the default on my computer
This problem seems to pop up very rarely on certain Macintosh systems. The problem is fixed by eliminating other languages from the MacOSX system menu, as described in Thinlinc bugzilla report at  https://www.cendio.com/bugzilla/show_bug.cgi?id=7167


BIRCH
Return to Remote Unix Desktop