acn logo Academic Computing & Networking
Websieve Instructions

Last update:


Websieve is a web-based tool which offers several advanced functions for managing your CC University of Manitoba email account. To use Websieve you will need an up-to-date web-browser with cookies enabled. Recent versions of the most popular web browsers are available at Software Express.

Websieve may be accessed from the CC Mail Management web-page. Click on the Filter button, and log in using your standard CC account username and password.

For basic account management functions, such as forwarding your mail, changing your password, setting a vacation message and checking your quota, you may find Easysieve easier to use. Websieve can perform these tasks, and will also allow you to set up server-side mail filtering, access control lists, and custom sieve scripts. Please note that any changes to your settings made in Websieve will overwrite previous changes made in Easysieve, and vice versa.

With webseive you can setup mail filtering scripts. These scripts, sieve scripts, are simple rules for filtering email. They allows a mail account holder to implement server-side filtering such as redirecting email to another email address, setting a vacation message, discarding unwanted mails (spam), rejecting messages from specific senders and moving particular messages into specific folders.

Once you have logged on to Websieve, you will have the following options:

Click on the links above for instructions for each function.

Change Password

You may change your CC account password here. Please keep in mind that the change will affect your Unix login, your U of M CC dial-up authentication, and any other service which requires your CC account information.
Change your password

  • Indicate your new password in both fields and click Save Changes

    Set Vacation

    If you will not be reading your email for an extended period of time, you may wish to set an auto-reply to incoming messages. Keep in mind that despite the vacation message, incoming messages will be kept in your Inbox and should be periodically removed to avoid exceeding your quota.

    Once you have clicked on Set Vacation the following table will appear:
    Set a vacation message

  • Vacation Active? must be set to Yes to enable your vacation settings. To return to normal mail delivery, and cancel your vacation message, set this to No. The previous vacation settings will not be lost, and may be re-activated at any time.
  • Vacation Text is the message that will be returned to anyone who sends a message to your CC account. Their message will remain in your Inbox until removed; they do not need to re-send it.
  • Once a sender has received your vacation message once, you may choose to prevent your auto-reply from being issued for subsequent messages from the same sender. Each originator will receive your vacation message a maximum of once every Repeat Days.
  • Additional Addresses: by default, your vacation response will only be sent in response to messages addressed to your CC email address (eg. umuser@cc.umanitoba.ca). This is so that your message is not sent to distribution lists. If you are retrieving email from another account, or have an alias for your CC address, you will need to indicate these Additional Addresses if you wish for messages sent to these addresses to initiate the auto-response.
  • Click Save Changes when you are finished.

    Forward Mail

    If you wish, you may have all messages that are sent to your CC email account redirected to another email account. This is called "forwarding" your email. Forwarding may be useful if you have several different email accounts, but wish to collect all messages at one single location, for example.

    After clicking on Forward your mail, a table will appear in the lower half of the page:
    Forward your mail

  • Indicate the destination email address. Do not enter your own CC email address here. If you wish to cease forwarding your mail, remove any address that appears here, and then save your changes.
  • Be certain to click Save changes to save your new settings.

    View/Edit Rules

    You may view or modify any of the rules that you have previously added with Add Rule here:
    View or edit your
	rules

  • Use the drop-down list shown above to enable, disable, delete or modify a rule. If you choose to modify a rule, select modify and then click Save Changes: the Add Rule form will appear and you may make the required changes.
  • When you have completed editing your rules, click Save Changes.

    Add Rule

    You may add a new filter rule with this function. You can use rules to manage incoming messages based on various criteria. For example, you could discard all incoming messages with the subject text "debt consolidation", or direct all messages larger than 1Mb to a folder named "Big". When you click Add Rule the following table appears:
    Add a new rule

    Filter rules take the general form IF the message satisfies some condition, THEN do something with the message. You may specify multiple conditions for one rule. You may choose whether the message must satisfy all of the conditions that you specify, or whether any of the conditions will satisfy the rule. The conditions which may be specified are:

    • from, to or subject field contains specified text
    • Msg size (message size) is less than or greater than some value in Kilobytes (eg. 1000 for 1Mb)
    • a user-specified field contains certain text. Valid fields include Date, X-Priority, etc.
    • You may Use regular expressions (top of table) for advanced expression string matching, rather than simple string matching for this rule. This option is recommended for advanced users only.
    Possible actions to be taken with messages which meet the above conditions are:
    • File Into: move the message into a particular IMAP folder (choose folder from list)
    • Forward: send the message to a different email address (indicate the email address)
    • Reject: discard the message and notify the sender with a specified text message
    • Discard: discard the message with no notification to the sender
    • If Continue checking other rules after applying this rule (top of table) is checked, then the message will continue to be processed by the script even if it satisfies your filter rule. A single message could therefore satisfy more than one rule, possibly resulting in multiple copies of the message or multiple responses.
    • Checking Keep a copy in your Inbox (top of table) will cause a copy of the filtered message to remain in the Inbox, regardless of other actions taken on it. Choosing this may result in multiple copies of your messages.
    Alternatively, your may specify a Custom Rule using raw script.

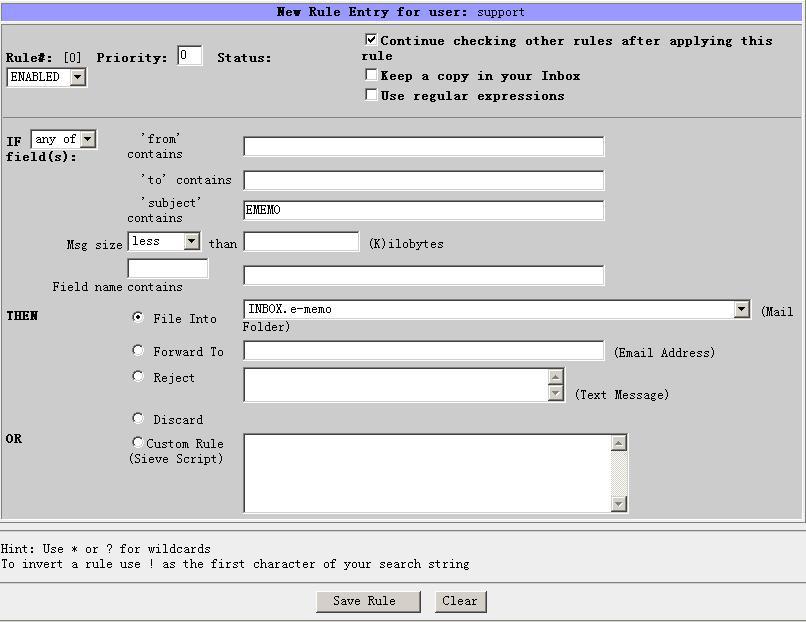
    Following are two examples of adding scripts. The first one filters messages based on subject and moves the message to a folder. 
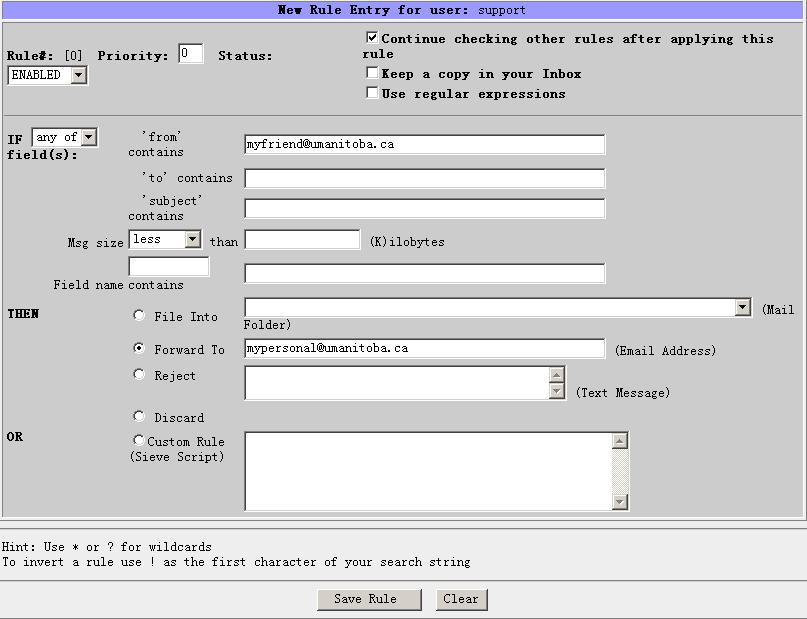
The second example filters email by sender.

    1. In this example emails with the subject containing EMEMO are saved to a folder in your inbox on the mail server labled e-memo. Note: that the folder on the mail server has to exist. For example, if you recive lots of email relating to a specific project you and you want that mail saved to a specific folder on the mail server, follow this example.
      example: adding a filter for ememos

    2. In this example emails with the sender myfriend@umanitoba.ca are forwarded to an email account mypersonal@umanitoba.ca. For example, if you have a second email account and you want all email sent to you from a specific address to be forwared to that email account, then folow this example.
      example: adding a new rule for personal email

    Set ACL's

    An ACL is an Access Control List. ACLs allow you to specify other CC users to have access to one or more of your IMAP mail folders. You can permit any level of access, ranging from full read and write privileges to permission to view message headers only. Once a user has been granted access to your folder, they will be able to subscribe to the folder with any IMAP mail client, such as Pine. The folder will appear in their IMAP folder tree as: user/youruserid/yourfoldername
    Set ACL's

  • ACL View: in this section you may view the ACL information for each of your IMAP folders. Use the drop-down list to select a folder. A list of usernames with access permission to the folder appears beside it. The level of permission is specified with up to 10 flags, as defined in the next area of the table.

  • Access Control List Entry: you may change the ACL information for a folder in this section:
    1. Select an IMAP folder from the Folder drop-down list. Access to folders must be set one folder at a time.
    2. Type in the CC username you wish to grant rights to in Foreign User ID
    3. Choose the rights to grant to this ID for this folder: you may choose either from the most common groups of permissions beside General Rights or may specify a custom combination of Specific Rights. You may remove the user's rights by selecting Remove access only.
    4. Click Set Acl when you are done, the user should now appear beside the appropriate folder in the ACL View section. NOTE: Save changes will not save your Acl information.
  • New Folder Creation: to create a new IMAP folder, specify a folder name, then click Save Changes.

    Advanced Options

    You may choose between basic and advanced script mode:


  • http://www.umanitoba.ca
    ACN is a department of IST at the University of Manitoba.
    Comments to: support@cc.umanitoba.ca