Be able to summarize the principle of the microscope
Be able to identify and explain the functions of the
different parts of the microscope
Be able to explain the purposes of different types of
lenses
Understand how using immersion oil affects resolving power
of the microscope
The principle of a microscope can
be sumarised as follows:
1.
Light is focused to a specific focal plane in the
sample, resulting in an image.
2. The image is
magnified such that a focused image is projected to a
focal plane at the observer's eye.
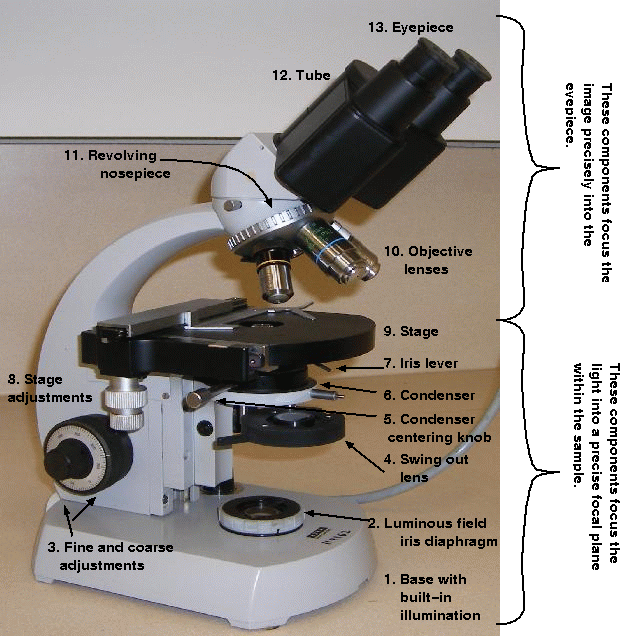
The microscope is the most important tool of the
cytologist
The compound microscope allows the observer to see
greater detail in small objects by magnifying and
resolving the image. Although chromosomes cannot be
seen by the naked eye, even a relatively low-power
compound microscope will allow a scientist to resolve
individual chromosomes in the eukaryotic cell.
Each of the parts of the microscope either contributes to
the creation or magnification of the image.
A compound microscope combines two or more lenses to
further focus and magnify the image. Lens magnifications are
straightforward, with a 10X lens creating an image 10X the original
object's diameter. A typical compound microscope has an eyepiece
lens (usually 10X) and three objective lenses (usually 10X, 40X, and
100X). The total magnification is a simple multiplication of the two
lenses, and so a typical compound microscope can achieve from 100X
to 1000X magnification.
As an additional note: Lens magnification is based on
standard microscope sizes, including the size of the tube the
lenses are installed in. If this standard size is changed, so
will the magnification.
Part
Function
Base
Contains illumination source
Luminous field iris diaphragm
Controls amount of light illuminating the sample
Fine and coarse adjustment knobs
Makes minute adjustments to the height of the stage,
allowing the sample to be brought into focus
Swing out lens
Holds filters and auxiliary lens
Condenser centering knob
Controls the position of the condenser
Condenser
Focuses light to control the area of the sample that is
illuminated
Iris lever
Controls the condenser or aperture diaphragm
Stage adjustments
Makes minute adjustments to the position of the stage at
a set height, allowing different areas of the sample to be
viewed
Stage
Platform for the sample
Objective lenses
Magnify the sample from the stage to the eyepiece lens
Revolving nosepiece
Allows interchange between three different objective
lenses
Tube
Allows installation of eyepiece lens (Tubes have a standard length of 160mm)
Eyepiece
Allows for further magnification of the image by the
eyepiece lens
The eyepiece actually has two functions: to
magnify and correct. The need for correction comes from the
different colours of light that are refracted. If the eyepiece is
over-corrected or under-corrected, the different colours of light
will not be balanced and the resulting image will show up as
coloured.
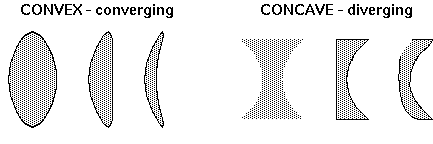
The microscope makes use of six simple lenses in combination
Magnification in the compound microscope is achieved by the use
of simple lenses. There are two broad categories of simple lenses:
positive lenses, which are thicker in the middle
(convex), cause light to converge. Negative
lenses are thinner in the middle (concave) and cause
light to diverge.
These broad categories contain three lenses each, to make the
six simple lenses. Positive lenses are biconvex,
planoconvex, and convex (converging) meniscus, while
negative lenses are biconcave, planoconcave, and concave
(diverging) meniscus.
The Six
Simple Lenses. The biconvex, plano-convex and convex
(converging) meniscus are positive lenses. The biconcave,
plano-concave and concave (diverging) meniscus are
negative lenses.
positive lenses
are thicker in the middle and therefore capable of converging light to a focus. These are termed biconvex,
plano-convex, and convex (converging) meniscus.
negative lenses
are thinner in the middle so that rays of light passing
through them are made divergent
termed biconcave, plano-concave, concave (diverging) meniscus
The most important part of the microscope are the objective
lenses. These different lenses allow the viewer to see the
specimen at different magnifications and easily switch between the
lenses with the revolving nosepiece. The objective lenses in
modern compound microscopes are also parfocal,
which means that switching from a lower to a higher magnification
lens keeps the image roughly in focus. While the fine focus knob
may be needed for adjustment, the image stays in view when
switching lenses.
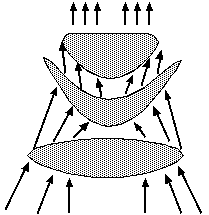
We have discussed the objective and eyepiece lenses, but another
part of the microscope has lenses also: the condenser. Unlike the
objective and eyepiece lenses, which serve to magnify the image to
the viewer, the lenses in the condenser are there to focus the
light on the sample. This is accomplished by combining several
simple lenses together. The combinations of lenses used in the
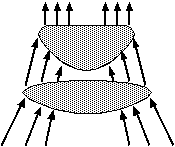
condenser can vary, from something like this:
...to something like this:
Or even this:
Can you name the types of simple lenses used
in these examples?
The effect that the simple lenses has on the light is
fundamental to the production of a useful image. Without a
condenser, the microscope would be a magnifying glass with no
resolving power of its own. The student microscopes are fitted
with Abbe (chromatic) condensers. They are simply constructed and
transmit a large amount of light.
The microscope's resolving
power depends on numerical aperture of the lens
Earlier on, we said that the microscope is able to magnify and
resolve an image, to allow the viewer to see tiny details in the
sample. The lenses accomplish the magnification of the image, but
the resolution is more complex. Many factors influence the highest
resolution a microscope can achieve, such as:
the wavelength of light passing through the microscope
the numerical aperture of the objective
lens
and the refractive index of the medium between the sample and
the objective lens (usually air or oil)
All these factors determine the resolving power,
or the minimum separation of two objects such that they
appear distinct and separate when viewed through a microscope or
telescope. The numerical aperture (NA)
is a measure of the resolving power of the objective lens only.
The upper limit of resolving power, of an objective lens or the
whole microscope, ultimately depends on the wavelength of light
used.
Why can't we just magnify the image?
The image we see through the eyepiece is the aerial image formed
by the microscope objective in the tube. This image has a limit,
where useful magnification ends and the empty magnification
begins. There is a good parallel with the grain of a photographic
film. As soon as the image details reach the same size as the
image grain, no further detail can be gained by magnifying the
image. In the same way, as you move closer and closer to the
photographic image on a projector screen, you reach the point
where you can no longer see the actual details on the photograph.
The performance limit of the microscope is determined by the NA,
so that the total magnification of the microscope is the objective
magnification multiplied by the eyepiece magnification times
NA.
NA is calculated using
a mathematical formula devised by Ernst Abbe for the direct
comparison of the resolving power of dry and all types of
immersion objectives.
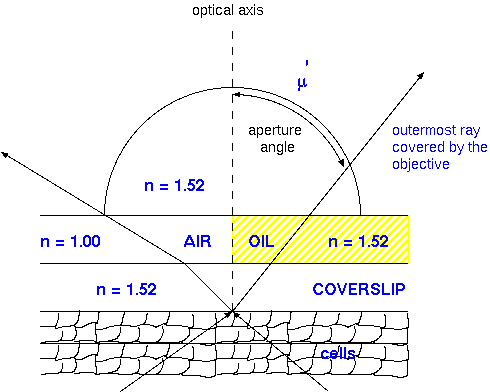
NA = n sin( µ)
where
n ::= the refractive index of
the medium between the front lens of the objective and the
cover slip.
When a ray of
light passes from a rare medium (air) to a denser medium (oil)
it is bent and refracted. Air has a refractive index of 1;
immersion oil has a refractive index of 1.5.
µ ::= the aperture angle
defined by the optical axis and the outermost rays still
covered by the objective
Thus, the numerical aperture is the sine of half
the angular aperture of an objective lens.
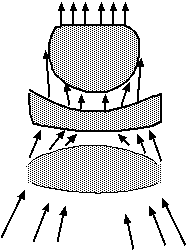
Comparison of dry and oil immersion objectives. The
values for NA range from 0.1 to 0.95 for dry objectives
and up to 1.5 for oil immersion lenses. Air has a
refractive index of 1. So for air, the image scatters
beyond the aperture angle. Immersion oil fills the
space between the cover glass and the front lens of the
microscope has a refractive index of 1.5. Oil keeps the
image within the aperture angle of the objective lens.
Angular Apertures of Objectives Compared.
The 3x objective is at a longer focal length, taking in
a larger area at a smaller angle. The 95x objective is
at a shorter focal length, taking in a smaller area in a
larger angle.
Overall, while we would like to be able to zoom in forever and see
all the tiny parts of the cell, we are limited by the wavelength of
visible light. Improving the NA of the objective lenses lies in two
factors, the NA of the objective lens itself, and the refractive
index of the medium between the sample and the objective lens.
Summary
The microscope is the fundamental tool of the cytologist. In
order to use it effectively, you need to understand key
concepts, like:
The principle of the microscope is to create and then focus
an image for the observer
Each part of the microscope contributes towards this
principle, either by focusing light or by magnifying the image
Different combinations of simple lenses are used to achieve
this
Immersion oil increases the numerical aperture of the
objective lens, and therefore the resolving power