Assignment 4
Genome Assembly
This
assignment is worth 20% of the course grade.
Due: December 9, 2024
Goal: To
test how low coverage of a
genome affects the quality of a genome assembly.
Rationale
The purpose of this assignment is to learn the steps of assembling a
small eukaryotic genome, and some of the conditions affecting the
quality of the assembly. Because of limited disk space for student
accounts, we don't have the luxury of using the complete set of
sequencing reads. Therefore, this assignment will create files
containing a subset of data from the published read set, and attempt
to assemble the genome using this smaller dataset.
The procedures for assembling a genome are described in the Genome
Assembly tutorial. In the original tutorial, a dataset using
5% of the published reads was used to demonstrate the process. In
this assignment, you will create a larger dataset, representing 10%
of the total reads, to see if better coverage of the genome will
result in a better assembly.
Main steps:
1. Create a sample set of sequencing reads.
2. Assemble R. diobovatum genome as described in the Genome
Assembly tutorial, replacing the data used in the tutorial
with your own dataset.
3. Discuss your results, in comparison to the data from the
original tutorial.
This assignment will be done using the Biolegato application
blreads. You can get an idea of how blreads works in the YouTube
video  BIRCH - Desktop
Bioinformatics (long version). The section on blreads begins
at 8:53 in the video.
BIRCH - Desktop
Bioinformatics (long version). The section on blreads begins
at 8:53 in the video.
Make sure to read the introductory page at the beginning of the
tutorial. In particular, note that as the assembly progresses, the
results of each step appear in a new directory, with naming to
indicate the steps that produced the files in that directory.
Because the assembly process is fairly complex, first run through
the tutorial using the data from the tutorial. Student accounts are
limited to 1 Gb of disk space. However, students may claim an extra
5 Gb of space as described in the tutorial on Obtaining
Extra Disk Space. Do the tutorial in
/local/workspace01/tutorials.
After completing the Genome Assembly tutorial, you should be ready
for the next steps.
1. (3 points) Create a sample dataset
of sequencing reads.
Note: To avoid running out
of disk space in your /local/workspace01 directory, it is
okay to delete the genome_assembly directory from the Genome
Assembly Tutorial. You will need about 3 Gb to complete
this assignment. Check your disk quota in the directory you
plan to work in using 'quota -v'.
|
Assuming that you previously obtained your extra diskspace, create a
directory for Assignment 4 as follows:
Go to your as4 directory, and then type
mkdir /local/workspace01/userid/assembly
chmod a+x
/local/workspace01/userid
ln -s /local/workspace01/userid/assembly
chmod a+rx
/local/workspace01/userid/assembly
You will now have in your as4 directory a symbolic link called
assembly. For this assignment, the report should be in the as4
directory, but all steps in the genome assembly process will be done
in the assembly directory.
Next, in your assembly directory, create a directory called reads.
Launch blreads in the reads directory. blreads shows the contents of
the current directory, which in this case is empty.
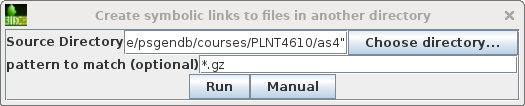
Choose File --> Create symbolic links
to files in another directory. Set the Source
Directory to /home/psgendb/courses/PLNT4610/as4. Set pattern
to match to "*.gz". This will create symbolic links to
all gzipped read files in the PLNT4610 as4 directory.
|
|
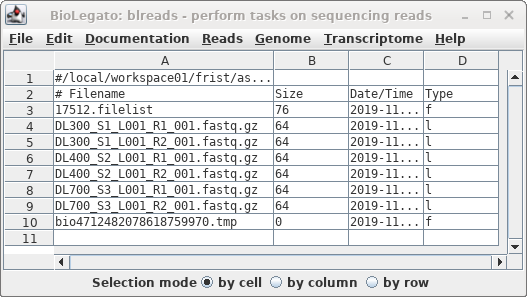
The links will appear in the blreads window.
Note that symbolic links are indicated by the letter "l" in
the Type column.
|
|
You can also verify that the creation of the links at the command
line:
lrwxrwxrwx 1
frist drr 64 Nov 6 20:21 DL300_S1_L001_R1_001.fastq.gz
-> /home/psgendb/courses/PLNT4610/as4/DL300_S1_L001_R1_001.fastq.gz
lrwxrwxrwx 1 frist drr 64 Nov 6 20:21 DL300_S1_L001_R2_001.fastq.gz
-> /home/psgendb/courses/PLNT4610/as4/DL300_S1_L001_R2_001.fastq.gz
lrwxrwxrwx 1 frist drr 64 Nov 6 20:21 DL400_S2_L001_R1_001.fastq.gz
-> /home/psgendb/courses/PLNT4610/as4/DL400_S2_L001_R1_001.fastq.gz
lrwxrwxrwx 1 frist drr 64 Nov 6 20:21 DL400_S2_L001_R2_001.fastq.gz
-> /home/psgendb/courses/PLNT4610/as4/DL400_S2_L001_R2_001.fastq.gz
lrwxrwxrwx 1 frist drr 64 Nov 6 20:21 DL700_S3_L001_R1_001.fastq.gz
-> /home/psgendb/courses/PLNT4610/as4/DL700_S3_L001_R1_001.fastq.gz
lrwxrwxrwx 1 frist drr 64 Nov 6 20:21 DL700_S3_L001_R2_001.fastq.gz
-> /home/psgendb/courses/PLNT4610/as4/DL700_S3_L001_R2_001.fastq.gz
|
In some bash configurations, live symbolic links will appear in a
aqua color, and gzipped files are highlighted in red.
You will create your dataset using SeqKit to generate a random
sample of 10% of the reads in the original files. Before running
SeqKit sample you have to run guesspairs.py, which groups together
read files into left and right reads. SeqKit has to know which files
go together, because it has to make sure that if a left read is
sampled, then the right read also appears in the sample.
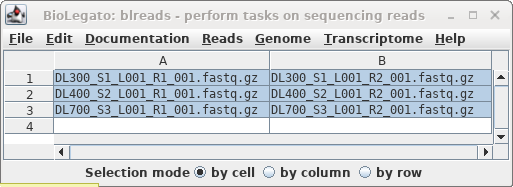
| As described previously in the Genome
Assembly tutorial, start by selecting the original
read files (.fastq.gz), and then File -->
guesspairs.py. By default "R1" and "R2" will be used
to identify the left and right read files for each set of
paired-end reads. Click on Run, and a new blreads
window will pop up with the files organized in pairs. |

|
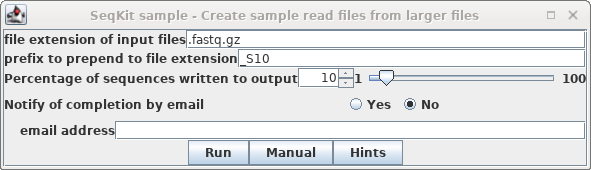
In blreads, select all the read files and
choose Reads --> SeqKit sample. Set "prefix to
prepend" to "_S10, and set Percentage of sequences"
to 10.
Click on Run.
|
|
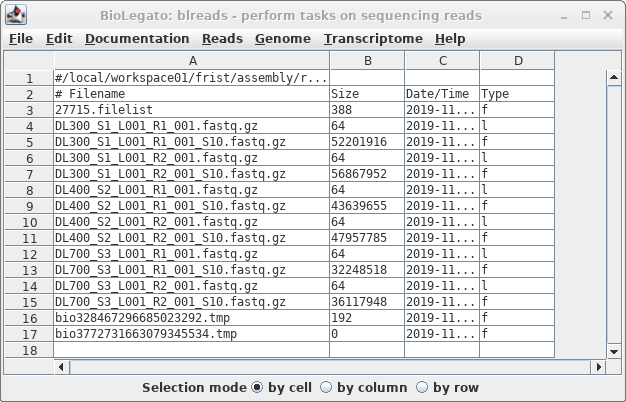
The sample files have the same name as the
original files, with the addition of "_S10" to the names.
Note that while the symbolic links have a very small size,
the sizes of the sample files indicate that these are read
files, not links.
The sample files will be your dataset for all subsequent
steps.
|
|
As a check that the sample files were created correctly, we expect
that the sample files should be about 1/10 the size of the original
files. In blreads, the size of the sample files is shown, but the
sizes of the original files are not, because blreads is showing the
symbolic links to those files, rather than the files themselves.
Fortunately, the ls command has the -L option that shows the size of
the file the link points to, rather than the link itself. In the
reads directory type
ls -lL
to see both the original and sample files for comparison.
2. (10 points) Assemble the genome using
your dataset.
In this section you will follow the Genome
Assembly tutorial to assemble the R. diobovatum genome
from your sample dataset.
a) Create symbolic links with short names to your sample read
files
Your genome assembly begins at step 0, but there are some
differences. Note that the read files in step 0 have names
containing the word "sample" eg.
DL300_S1_L001_R2_001_sample.fastq.gz, whereas your read files will
contain the string "_10" eg. DL300_S1_L001_R1_001_S10.fastq.gz. In
step 0, you will create symbolic links with short names for use in
the remainder of the tutorial. To minimize confusion, it is probably
best to just use the same short names as seen in the tutorial. For
example, after creating the link and renaming it, the link to
DL300_S1_L001_R1_001_S10.fastq.gz would have the name
DL300_R1.fastq.gz. From this point, filenames should appear exactly
as shown in the tutorial.
IMPORTANT!: This is a tedious but very
important step. When creating links, you need to make absolutely
sure that you are choosing the correct target file (which includes
"S10"), and making sure that the string you plan to change is found
in the target filename. To verify that you have all six symbolic
links done correctly, type ls -l *R[12].fastq.gz, which should give
the following output:
lrwxrwxrwx 1 frist
drr 33 Nov 7 15:08 DL300_R1.fastq.gz ->
DL300_S1_L001_R1_001_S10.fastq.gz
lrwxrwxrwx 1 frist drr 33 Nov 7 15:09
DL300_R2.fastq.gz -> DL300_S1_L001_R2_001_S10.fastq.gz
lrwxrwxrwx 1 frist drr 33 Nov 7 15:10
DL400_R1.fastq.gz -> DL400_S2_L001_R1_001_S10.fastq.gz
lrwxrwxrwx 1 frist drr 33 Nov 7 15:15
DL400_R2.fastq.gz -> DL400_S2_L001_R2_001_S10.fastq.gz
lrwxrwxrwx 1 frist drr 33 Nov 7 15:11
DL700_R1.fastq.gz -> DL700_S3_L001_R1_001_S10.fastq.gz
lrwxrwxrwx 1 frist drr 33 Nov 7 15:12
DL700_R2.fastq.gz -> DL700_S3_L001_R2_001_S10.fastq.gz
|
Do not proceed until you get this right! Note that the blreads File
menu also has a delete function, if you want to delete specific
links that were made incorrectly. You can also use the Edit
--> blsort, to your advantage to make it easier to look at
groups of file names.
b) Calculate the genome coverage of your experimental dataset
In this step, you will calculate the ideal read coverage for
sequencing the R. diobovatum genome, as well as the actual coverage
of the full dataset, and the sample datasets.
Save the LibreOffice spreadsheet file coverage_template.ods to your as4
directory as coverage.ods. In coverage.ods, fill in the
formulae needed to calculate the number of reads for 1-fold
coverage, as well as 50-fold coverage, for a genome of 21,000,000 bp
using 150 nt reads. The coverage statistics for the full dataset and
the sample dataset from the tutorial are also included in this
file. Note that the "actual coverage" calculations depend on the
1-fold coverage calculation in cell B9.
Once you have completed those calculations, run Reads -->
SeqKit stats to generate statistics for your own sample reads.
To save the SeqKit results, choose Edit --> Select All
and then File --> Save SELECTION As. Set File format to tsv,
and type in the filename S10stats.tsv. Open your
S10stats.tsv file in LibreOffice Calc, and paste the statistics into
the rows provided in coverage.ods.
In your report, you will be asked to summarize the findings from
this section.
c) Assemble your reads using Abyss, Spades and SOAPdenovo2.
Save a copy of assemblies_template.ods
to your as4 directory under the name assemblies_S10.ods.
Follow the steps in the Genome Assembly tutorial to create genome
assemblies using Abyss, Spades and SOAPdenovo2. As you complete each
assembly, copy the results for scaffolds to your assemblies_S10.ods
file. The spreadsheet for these results should pop up in LibreOffice
each time a Quast run is complete. Alternatively, this data can be
found in the quast_results/transposed_report.tsv for each assembly.
Additional notes:
- For this dataset, most programs will complete within a few
minutes, but several will take longer. See Approximate Running Times below.
3. (5 points) Conclusions - What have you
learned?
- Summarize the differences in coverage between the desired
coverage of 50-fold, and the actual coverage calculated from the
sample dataset and your dataset.
- Compare the Quast results, as summarized in the Quast reports
and in the spreadsheets for the different assemblies. How do the
assemblies from your datasets compare in quality to the
assemblies from the full dataset (assemblies_fulldata.ods)
and sample datasets (assemblies_S5.ods)?
Explain the observations that led to your conclusions eg. what
criteria did you use and how do you decide which is the best of
the assemblies, for a given dataset?
4. (2 points) Presentation.
Part of the grade will be determined by the quality of your
web page(s) for the assignment, including:
- The assignment page(s) must be accessible at
http://home.cc.umanitoba.ca/~userid/PLNT4610/as4/as4.html
or http://home.cc.umanitoba.ca/~userid/PLNT7690/as4/as4.html
No other URL will be accepted.
- All links must work, and all graphics must display. Each time
I have to contact you to fix something, 1 point will be
deducted. You get no credit for anything I can't access.
- Pay attention to the organizational and stylistic hints found
in Lecture
2. Do what it takes to make it easy to read and to
understand the points you wish to get across.
How to get
started
1. Create a directory called either
public_html/PLNT4610/as4 or public_html/PLNT7690/as4. Make this
directory world-readable and world executable.
2. Do all work in the as4
directory. That way, all your files will already be where they
need to be.
What
you need to complete your assignment
Your report should include the following:
1. Output from ls -l *R[12].fastq.gz, showing
the short name symbolic links to your experimental read files.
2. Briefly summarize the coverage results, and provide links to
the following files:
- coverage.ods
- assemblies_S10.ods
- For the Abyss, Spades and SOAPdenovo2 assemblies, each of
"report.html" files in the quast_results directories for
Abyss, SOAPdenovo2 and spades.
3. Conclusion - Brief discussion of results, as
described above.
How to post it
1. Create a new HTML file called as4/as4.html. Your web page
for Assignment 4 should take the form of a report, that makes it
easy to figure out what you did.
2. Make all files in the as4 directory world-readable (chmod a+r *).
3. cd into your assembly directory and type
correct
The correct script descends recursively through a directory
tree, making all files world-readable and all directories world
readable and searchable.
3. Edit either PLNT4610.html or PLNT7690.html to include a link
to as4/as4.html.
4. In the Firefox or SeqMonkey Browser, go to your home page
and follow all hypertext links to your assignment, and test all
links to your output files.
5. If you paste excerpts of output into a web page, change the
output section to a fixed font such as Courier, or
set the style to "Preformat". The output from most sequence
programs assumes that each character takes up an equal amount of
width, which is not true for proportional fonts such as Helvetica or Times.
Academic integrity: Your work is assumed to be your own
original work. All University policies regarding academic
integrity apply.
On the day the assignments are due, I should be able to just go
to each person's web site and find the output. You don't need to
send me an email message saying that your assignment is complete.
If you choose not to hand in this assignment, you don't need to do
anything.
Approximate
running times
The actual execution times required for each step
will vary depending on the load on the system, but here are some
typical "wall clock" times for jobs requiring more than 1 min. for
this dataset:
program
|
time (min.)
|
Trimmomatic
|
2
|
pollux
|
8
|
abyss
|
9
|
spades
|
6
|
SOAPdenovo2
|
7
|
For this dataset, you can assume that all other programs run in a
short time.