Assembling Pentagons Without Dowels
First, tear 10 pieces of 1'' masking tape, each piece about 1.5 - 2.5'' long. Make a few longer ones, and one or two shorter ones. Tack them to the edge of the table, so they can be pulled off easily.
Choose the next five pieces in the pile. I have tried to have each layer chosen from ''adjacent'' pieces in the board, though many layers are from two different areas. In this way, the likelihood is that pieces are of similar colour and thickness. Also, if one angle is 'out', then maybe all are in the same proportion, cancelling each other out. Variances in width also occur (despite all attempts), surely from the snipe of the planar - but I process them anyways in case I get stuck for 'good' pieces.
Perform a dry fit.
The mould: On a 2 × 8, screw three blocks in the pattern:
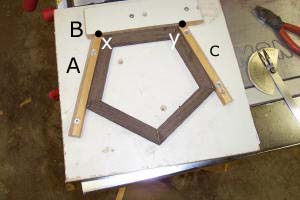
Here |xy| = 5.0625 and the angle between block B and C (at point y) is exactly 108 degrees.
Block A only has one screw that can be twisted a bit if needed. Also note that in a perfect fit, block A will be parallel to the corresponding edge, but will have a 0.0625'' gap. (Small anomalies present good/proper pressure on a joint, so 0.0625 is given for error correcting.)
After assembling pieces in an order that 'looks good', dry fit each joint separately to check for vertical and possible closure of top side of joint (pieces are outside face = up). Then try to dry fit all simultaneously with slight pressure from the thumbs. Sometimes pieces need to be recut or discarded. A piece could have twisted in the saw, or got pulled into the cut.
Put pieces aside that can't be repaired. It is now time to glue up. I take out pieces one at a time, applying glue to both ends. Then I transfer some to various other ends. Continue until all have a good coat. Only apply glue to the outer 2/3 of the joint because any glue squeezing out to the inner joint of the pentagon makes it difficult to remove, and shows up in the finishing stage. Scrape up any such glue on the interior of the joint (with chisel), and then wash with wet rag.
In fact, try not to get glue on interior face because power sander can't go there. Any glue squeezing out top/bottom/outside is okay because it all will be sanded. In the event of 2 pieces being different thickness, put finish edge on top.
Apply masking tape to tops of joints, with a little tension on each to keep top side of joint tight (just squeezing out a bit of glue along entire joint). A 'good joint' has two outside corners matching exactly, so keep tape off the very corner (to watch). Then, pop pentagon out of mold by applying slight pressure to x and y.
Turn over, repeat with 5 more, now pressing down to get flush on bottom (i.e., the outside). Close up bottom joints as well, thus applying a good force to entire joint.
If it appears that pieces are getting scarce, do minor fills on inside. Now flip over to original good side up. Press each joint into the angle at y, checking for true.
Clean glue off mold, and return to the tape tearing step.