
NUMSEQ documentation:
$doc/fsap/numseq.txt
BACHREST documentation: $doc/fsap/rest.txt
{brassica:/home/plants/frist}cd
do next step
if
$HOME/tutorials doesn't exist
{brassica:/home/plants/frist}mkdir
tutorials
create directory for this
tutorial
{brassica:/home/plants/frist}mkdir
tutorials/sequence
{brassica:/home/plants/frist}cd
$birch/tutorials/bioLegato/sequence
the
location of birch ($birch) is /home/psgendb in this
example
{brassica:/home/psgendb/tutorials/bioLegato/sequence}cp
*.gen $HOME/tutorials/sequence
copying
GenBank files to new directory
return to $HOME directory
verify that new files and
directories are present
{brassica:/home/plants/psgendb/tutorials/bioLegato/sequence}cd
{brassica:/home/plants/frist}ls
-l
drwx------
1 frist drr 512 Oct 31
10:11 tutorials/
{brassica:/home/plants/frist}cd
tutorials
{brassica:/home/plants/frist/tutorials}ls
-l
drwx------
3 frist drr 512 Oct 31
10:11 sequence/
{brassica:/home/plants/frist/tutorials}cd
sequence
{brassica:/home/plants/frist/tutorials/sequence}ls
-l
-rw-------
1 frist frist 5404 Oct 31 10:13
X52331.gen
-rw------- 1 frist frist
10739 Oct 31 10:13 PBI101TD.gen
-rw------- 1 frist
frist 8278 Oct 31 10:13
pBSGUS.gen
-rw------- 1 frist frist
3674 Oct 31 10:13 PEACAB15.gen
Files with the .gen extension are in GenBank format. Since these
are ASCII text files, you can view them in any text editor. Double
clicking on a file in the file manager will bring up the file in the
default text editor for your bioLegato installation.
NUMSEQ is a program for printing out, translating, and subcloning sequences. It runs at the command line. The main menu handles file input and output. Output can either be to the screen or to a file. In the example, the output file has been called PEACAB15.numseq to indicate that the file contains output from numseq.
Example: Reading and printing PEACAB15.gen with NUMSEQ
The parameter menu controls how the sequence is printed. Type '4' in the main menu to bring up the Parameters menu.
Name: PEACAB15 Topology: LINEAR Length: 822 nt
________________________________________________________________________________
 Parameter Description/Response Value
________________________________________________________________________________
 1)START first nucleotide printed 1
 2)FINISH last nucleotide printed 822
 3)NUCCASE U:(A,G,C,T...), l:(a,g,c,t...) U
 4)STARTNO number of starting nucleotide 1
 5)GROUP number every GROUP nucleotides 10
 6)GPL number of GROUPs printed per line 7
 7)WHICH I: input strand O: opposite strand I
 8)STRANDS 1: one strand, 2:both strands 1
 9)KIND R:RNA D:DNA D
 10)NUMBERS Number the sequence (Y or N) Y
 11)NUCS Print nucleotide seq. (Y or N) Y
 12)PEPTIDES Print amino acid seq. (Y or N) N
 13)FRAMES 1 for this frame, 3 for 3 frames 1
 14)FORM L:3 letter amino acid, S: 1 letter L
________________________________________________________________________________
Type number of parameter you wish to change (0 to continue)
By default, NUMSEQ will print out the entire sequence (from START to
FINISH) as a single strand (STRANDS) in 7 groups (GPL) of 10
nucleotides (GROUP) per line. To change parameters, type the number
of a parameter, and you will be prompted for a new value. When you're
ready to view the sequence with the new parameters, type '0' at the
prompt and '5' in the main menu to print the sequence to the screen.
To view both strands:
8) STRANDS: 2
To translate in 3 reading frames:
12) PEPTIDES: y
13) FRAMES: 3
5) GROUP: 15
6) GPL: 4
NUMSEQ breaks up the sequence into groups of nucleotides, numbering each group. For translation, GROUP must be divisible by 3, because translation is done in discrete codons of 3 bases each. GPL is set to 4 so that the output line will fit on a typical 80-character line.
To limit printing to only part of the sequence eg. bases 200 - 400:
1) START: 200
2) FINISH: 400
To view the opposite strand of the same region:
7) WHICH: o
1) START: 400
2) FINISH: 200
This example illustrates that creating an opposite strand requires two steps. First, we have to specify the strand as 'o' (opposite) rather than 'i' (input strand). This causes the bases to be complemented. However, if all we do is complement the input strand, then the opposite strand would be printed 3' to 5', because we would be starting at 200 and ending at 400. Therefore, START must be set to 400, and FINISH to 200.
bioLegato is a program that runs other programs. bldna is an instance of bioLegato that contains functions and programs specifically for DNA sequences. As you will see, the program runs in the window in which a bioLegato instance was started. The bioLegato instance generates the keystrokes that you would normally be typing.
To illustrate the point, let's try running NUMSEQ from bldna.
Launch bldna from the command line.
{brassica:/home/plants/frist/tutorials/sequence}bldna
|
IMPORTANT NOTES: |
Read in PEACAB15.gen:
File --> Open
Click on the filename, and click 'Open'.

|
Hint: There are 2 steps to running a program from a bioLegato instance 1. Select sequence(s) - either:
2. Choose a program from one of the menus |
To run numseq, click on PEACAB15 and choose DNARNA --> NUMSEQ.
The numseq menu appears, containing menu items for all parameters in the NUMSEQ Parameters menu.

|
HINTS ON bioLegato MENUS:
|
When you click OK, bldna saves the specified sequence in a temporary file, and runs numseq. Numseq reads in the temproary sequence file and prints it out according to the parameters sent to it by bldna. Output is stored in a temporary file, which is opened in a text editor.

Normally, the temporary output file (eg. bioLegato2155281324855234117.tmp.out) will be deleted when you quit the Text Editor window. To save the file, choose File --> Save As and type in a name for the output. It's a good idea to include a .numseq file extension to indicate that this file is output from numseq.
Because the output is ASCII text, you can do lots of things with
it, including importing it into a word processor, pasting it into
another window, mailing it, or even using it as input for other
sequence programs. In the latter case, the output will probably need
to be modified to conform to the desired input file format eg.
Pearson/Fasta.
 Circular
DNA molecules require a bit of thought. Since printing is always done
5' --> 3', the direction (clockwise vs. counterclockwise)
determines the strand, or vice versa. Consider the Bluescript cloning
vector (GenBank X52331). Conceptually, one base must be arbitrarily
labeled as 1. In the GenBank entry, 1 is the first base in the file,
and 2958 is the last base in the file. In the physical plasmid, of
course, base 2958 is adjacent to 1.
Circular
DNA molecules require a bit of thought. Since printing is always done
5' --> 3', the direction (clockwise vs. counterclockwise)
determines the strand, or vice versa. Consider the Bluescript cloning
vector (GenBank X52331). Conceptually, one base must be arbitrarily
labeled as 1. In the GenBank entry, 1 is the first base in the file,
and 2958 is the last base in the file. In the physical plasmid, of
course, base 2958 is adjacent to 1.
In NUMSEQ, the START, FINISH and WHICH parameters govern which parts of the sequence are displayed.
To view the top strand of the PvuI (CGAT^CG) fragment going clockwise from 2417 to 503:
1) START: 2417
2) FINISH: 503
7) WHICH: Original
Since you're only considering 1 strand at a time, you want to start with 2417, which is the 5' end of the small PvuI fragment, on the original strand.
To print the same sequence on the other strand, we can't just change WHICH to 'Opposite".
1) START: 2417
2) FINISH: 503
7) WHICH: Opposite
Try it and you'll see that what you get is the large PvuI fragment going from 2417 to 503, and that this fragment doesn't even terminate where PvuI would cut. It's best to visualize the fragment ends as illustrated below:
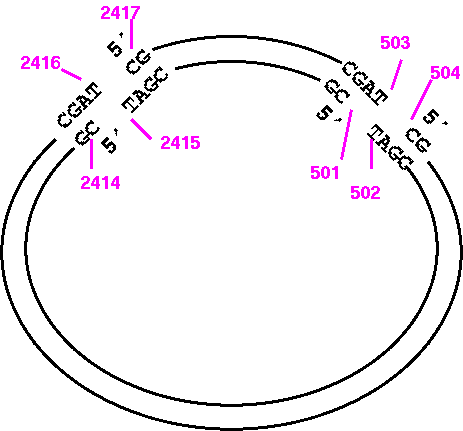
So the correct way to print the opposite strand of the small fragment would be:
1) START: 501
2) FINISH: 2415
7) WHICH: Opposite
Example: Simulated restriction digest of a
pBluescriptKSm13+ at BamH1
The BamHI site is at 690 on
the input strand, meaning that the 5' end of the BamH1 site on the
original strand is at position 690. Thus:
1) START: 690
2) FINISH: 689
7) WHICH: Original
If we wanted the inverse complement (ie. counter clockwise), the NUMSEQ parameters would be
1) START: 693
2) FINISH: 694
7) WHICH: Opposite
Any recombinant construct can be simulated by pasting together the
correct sequences into a single file.
One easy way is to use
NUMSEQ to print out the precise fragments required, and paste them,
in the correct order, into a file, using any text editor.
EXAMPLE: Cloning beta-glucuronidase gene (GUS) from pBI101 to pBluescriptKSm13+.
The GUS gene in pBI101 can be conveniently excised using BamHI and
SacI (see map).
The goal is to make a datafile that correctly represents the
recombinant construct that results from cloning the BamHI/SacI
fragment containing the GUS gene into the BamHI/SacI-digested
BlueScript plasmid. It should look something like this:
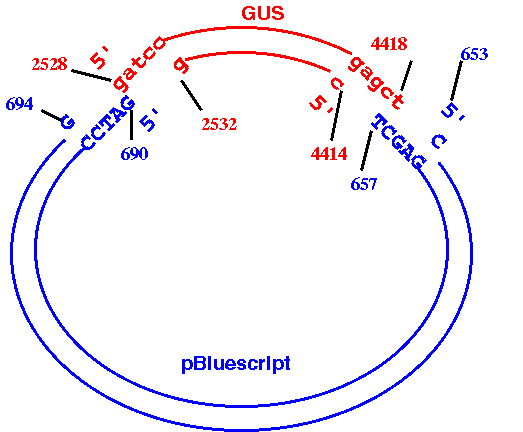
How to do it:
a. Read GenBank entries for pBI101 (PBI101TD.gen) and pBluescriptKSm13+ (X52331.gen) into bldna.
b. Use DNARNA --> BACHREST to find the locations of the BamHI and SacI sites in PBI101TD. (PBI101TD BACHREST output). According to BACHREST, the 5' ends of the BamHI and SacI sites are at 2528 and 4419, respectively. Therefore, the 3' end of the fragment we want is at 4418, not 4419.
(See 'II. What the output means' in the BACHREST documentation file rest.txt for details on the output.)
c. For PI101TD, use DNARNA--> NUMSEQ
START: 2528
FINISH: 4418
Save this output as pBSGUS.dna, and minimize the window to get it out of the way.
d. Use DNARNA --> BACHREST to find the locations of the BamHI and SacI sites in X52331. (X52331 BACHREST output). According to BACHREST, the 5' ends of the BamHI and SacI sites are at 690 and 658, respectively. Since the GUS fragment terminates at a SacI site, the SacI site from the plasmid must come next, with the BamHI site at the other end. We need to generate the opposite strand of the plasmid, going from the 5' end of SacI to the 3' end of BamHI.
e. For X52331, use DNARNA --> NUMSEQ
START: 653
FINISH: 694
WHICH: Opposite
Copy this output to the end of pBSGUS.dna and save the fille.
|
Have you adequately documented your work? One of the standards in scientific publications, and in all aspects of experimentation, is do document your work succinctly, but with enough detail so that any other worker skilled in the field would be able to reproduce what you did. Therefore, it's not sufficient just to say something like, “the GUS gene from pBI101 was cloned into Bluescript.” Which Bluescript vector? Which restriction fragment, and which site or sites in the vector? See the sample file, pBSGUS.dna for an example that uses the GenBank accession numbers and feature syntax to precisely describe how the insert was cloned into the vector. |
f. Before going any further, verify that the construct has been built correctly. One way to do this is to use NUMSEQ to generate double-stranded printouts of both original sequences, and then mark the positions of the restriction sites on these printouts. Print out pBSGUS.dna and compare the sequence at the cloning junctions to the sequences in the originals. Make sure that complete BamHI and SacI sites appear at these junctions. There should be a BamHI site (G^GATCC) at 4809 and a SacI site (GAGCT^C) at 1892.
g. Convert pBSGUS into a Pearson/Fasta file to be read by SEQUIN.
In bldna, use File --> Import Free Format (FSAP), to read in 'pBSGUS.dna'. Note that free-format files do not contain sequence names, so the filename is used as the sequence name, in bioLegato. Since we don't want the .seq extension to be part of the name, get rid of '.dna' in Edit --> GetInfo. The name should now be 'pBSGUS'. Also, in the GetInfo menu for pBSGUS, change the topology to Circular.
Save the file by choosing File --> Export Foreign Format. Set the output format to "Pearson/Fasta", and type 'pBSGUS.wrp' in the "Save As?" box.
h. The last step in creation of a sequence file is annotation. This is critical, because it documents precisely what you have done. The ability to reproduce results is as important in computers as it is in the lab. GenBank format is the richest and most versatile sequence file format, and it is read by most sequence programs. SEQUIN automates the process of creating GenBank format files.
The menus in SEQUIN walk you throught a step-by-step process of the minimal information needed for a GenBank entry. Without going into every step, the over all series of events is as follows:
1. Start SEQUIN by typing 'sequin' at the command line.
2. Choose "Start new submission"
3. Fill in information in the Submission, Contact, Authors and Affiliation (all required)
4. You will see a window entitled 'Sequence Format'. Continue with the default settings.
5. On the page entitled Nucleotide, click on "Import Nucleotide FASTA" to import your .wrp file
6. Click on "Specify Topology" and set the topology to 'Circular'.
6. On the Organism page, click on the Add Organisms, Locations, and Genetic Codes. Type in 'synthetic construct' under the heading Organism.
7. This is the minimum information needed to create a GenBank entry that can be used as a model for a restriction digest. Once the minimal information has been entered, follow the 'Next Page' links until a window pops up with the GenBank entry in it. (For other purposes, you may wish to annotate locations of coding sequences and other features of interest. In a laboratory setting, if you were planning to submit the sequence to GenBank, the most critical things to annotate for a construct such as this are the precise sources of the component sequences, in the FEATURES TABLE, along with a simple explanation in words in the DEFINITION line.)
8. To export your sequence to a GenBank file, choose File --> Export GenBank. Save your sequence as pBSGUS.gen.
A good introduction to SEQUIN, including screen shots, can be fund at http://www.ncbi.nlm.nih.gov/Sequin/.
i. Test your GenBank file by reading it into bldna, and running BACHREST. The BACHREST output should show that pBSGUS is circular, and the BamHI and SacI sites at 1 and 1892, respectively (pBSGUS.bachrest).