PLNT4610/PLNT7690 Bioinformatics

DATABASE PROJECT

Creating your database


A. Download and install the as3db database

1. Create a directory for PLNT4610 or PLNT7690 (example will show steps for PLNT4610).

cd
mkdir PLNT4610
chmod a+rx PLNT4610
cd PLNT4610


2. Download
as3db.tar.gz to your PLNT4610 or your PLNT7690 directory.

3. cd to your PLNT4610 or PLNT7690 directory

4.  Extract the files from the archive:
gunzip as3db.tar.gz
tar xvfp as3db.tar
cd as3db
ls -l
-rwxrwxr-x 1 frist frist 293 Dec 4 17:02 as3db.py
lrwxrwxrwx 1 frist frist 12 Oct 30 2014 bin -> masterdb/bin
lrwxrwxrwx 1 frist frist 36 Dec 2 19:04 birchace.py -> /home/birch/BIRCH/script/birchace.py
lrwxrwxrwx 1 frist frist 36 Dec 2 19:04 birchenv.py -> /home/birch/BIRCH/script/birchenv.py
drwxr-xr-x 2 frist frist 4096 Dec 5 09:59 database
-rw-r--r-- 1 frist frist 9889 Nov 16 2009 example.ace
drwxr-xr-x 2 frist frist 4096 Mar 16 2004 externalFiles
lrwxrwxrwx 1 frist frist 37 Dec 2 19:03 masterdb -> /home/birch/BIRCH/public_html/birchdb
drwxrwxr-x 2 frist frist 4096 Dec 2 19:05 __pycache__
-rw-r--r-- 1 frist frist 3730 Dec 5 09:48 README
lrwxrwxrwx 1 frist frist 14 Oct 30 2014 whelp -> masterdb/whelp
drwxr-xr-x 2 frist frist 4096 Dec 5 09:58 wspec

5. Follow the instructions for setting up the database, found in the as3db/README file.

Your main window for as3db should look something like this:

B. Adding and modifying classes

(For an in-depth description of models in ACeDB, see "A Guide to Models and Ace Files, starting on pg. 68 of the ACeDB manual.)

The classes from the sample database are implemented in the file as3db/wspec/models.wrm. By copying and modifying classes in this file, you can create your own classes, as described in your schema. To illustrate the process, let's try creating a new class called DNA_sample. (ACEDB doesn't allow blanks in names.)

Hint: Before editing a critical file like models.wrm, it is always a good idea to make a copy of the current version of the file, so that you could always revert to it if you really mess things up. For example, before editing the file, make a copy called models.wrm.bak1. The file extension can be anything, but 'bakx' is often used for different versions of backup files.

Open the file as3db/wspec/models.wrm in a text editor. One easy way to do this is to use the file manager to find the file, right click on the file, and choose Open With --> Nedit.

Hint: For the next part of the tutorial, you may avoid some typing errors by copying and pasting lines from this tutorial into your models.wrm file.


Find the Seed_stock model:

//------------------------------------------------------------------
?Seed_stock Experiment  ?Experiment XREF Seed_stock
            Line UNIQUE ?Genotype XREF Seed_stock
            Container   ?Container  XREF Seed_stock

and copy the first two lines of the Seed_stock model:

//------------------------------------------------------------------
?Seed_stock Experiment  ?Experiment XREF Seed_stock

(Lines beginning with '//' are comment lines to make your models.wrm file more readable.)
Modify the Seed_stock line as follows:

?DNA_sample Experiment  ?Experiment XREF DNA_sample


This creates a new class called DNA_sample, for which the first data item is a link to an object of the Experiment class. The phrase 'XREF DNA_sample'  tells ACeDB to also make a tag in the Experiment class that refers back to the DNA_sample class. To ensure that the two-way link is complete, we now have to add following line to the Experiment model:

            DNA_sample ?DNA_sample XREF Experiment

The 'XREF Experiment' phrase completes the 2-way link, indicating that the DNA_sample class will have a tag called 'Experiment' that points back to the experiment class.

Save models.wrm by choosing File--> Save in the text editor.

Making your classes visible
For every class that you add to models.wrm, you must also add a line to wspec/options.wrm, indicating whether it is a visible class ie. whether it should be displayed in the main window. For example, to add the DNA_sample class, the following line would be added to options.wrm:

_VDNA_sample     -V

(Both the _V and -V are required. More detailed instructions are included in the options.wrm file.


To read in the updated models.wrm file, go to the main ACEDB window and choose Edit--> Read models. If there are no errors in models.wrm, no error messages will be reported. If there are errors, an window will pop up telling you which model has an error, and on which line the error occurs.

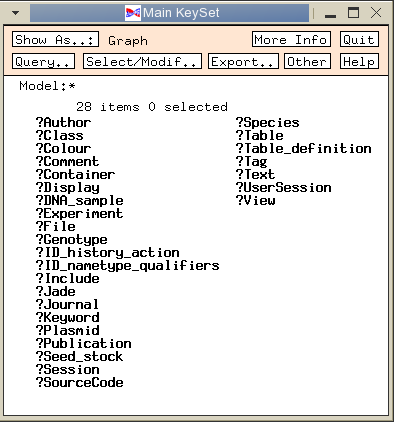
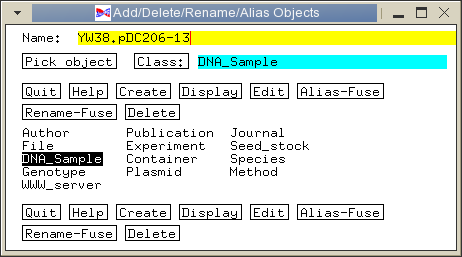
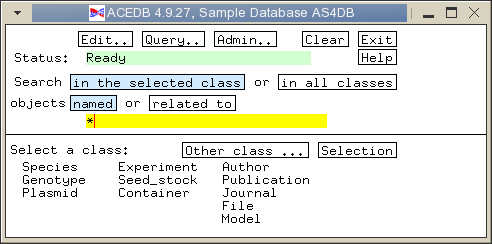
Next, you have to tell ACEDB to display the DNA_sample class in the main window. Click on the 'Selection' button in the main window, and the following window will pop up:


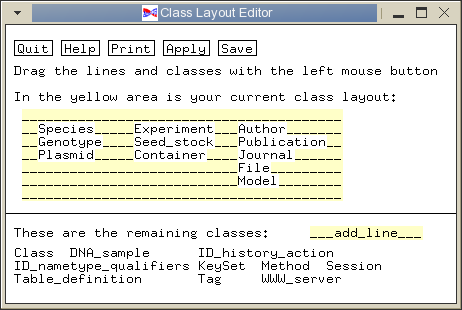
Use the left mouse button to drag the text 'DNA_sample' into the yellow class layout block. Place DNA_sample between Seed_stock and Container, and click Save.

We can refine the DNA_sample class by adding data fields or links to other classes. For example

//------------------------------------------------------------------
?DNA_sample Experiment  ?Experiment XREF DNA_sample
            Plasmid     ?Plasmid    XREF DNA_sample
            Conc_ug_ul  float
            Box         ?Container XREF DNA_sample

(NOTE: Indentation should be consistent within models.wrm! Tags should line up with tags, and fields should line up with fields. Use spaces, rather than TAB characters.)

These changes imply that we must also add a line to the Plasmid class


            DNA_sample     ?DNA_sample XREF Plasmid

and a line is added to the Container class:

            DNA_sample  ?DNA_sample XREF Box

Again, each time you modify a class, you must choose Edit --> Read models for the changes to take effect.

You can review the model within ACEDB by clicking on the "Models" class in the main window, which brings up a keyset containing all models defined in the database:


Double click on ?DNA_sample to review the structure of this class:


Take home lesson: When you're learning to use ACEDB, make changes to models in small increments, rather than adding a new complex model in one step. That way, when messages pop up, the message must refer to the one change you've made since the last successful Read models command.

C. Entering data using the xace program

Up to this point we have been talking about abstract classes. The classes create the structure of the database.  We need to recall the central paradigm of object-oriented databases: an object is an instance of a class. For the other classes, acedb read data for many objects when the example.ace file was read. However, there are no objects yet that are members of the DNA_sample class. Let's create a DNA_sample object.

From the main ACEDB menu choose Edit-->  Add/Delete/Rename/Alias objects. To create an object of the DNA_sample class, click on the Class: button and choose 'DNA_sample'.  Now, type in a name for the sample in the yellow Name: box. For the purposes of the example, we'll use the Fristensky Lab sample naming convention of experiment_number.sample_name. Every experiment gets a number, in this case YW38, where YW is the initials of the lab worker, separated by a dot, followed by a sample identifier, in this case 'pDC206-13', the name of the plasmid DNA. Both of these items would be written on the tube of DNA, so that at any time, the precise origin of the material in any tube can be documented. For a full description of our conventions on recording laboratory data, see Writing Experimental Protocols. The window should look like this:


Now, click 'Create' to create the object. An empty object will pop up named YW38.pDC206-13. To fill in values move the cursor into the window and hold down the right mouse button. Choose 'update'.


We want to link this object to an experiment, but the experiment doesn't yet exist. Double click on ?Experiment which will turn into a yellow box. Ignoring the pop-up message for now, type in 'YW38'

Press the 'Enter' key and an Experiment object named YW38 will be created, with a link shown in bold.

To fill in the Plasmid field, we can point to an already existing plasmid, pDC206-13. Again, double click on the ?Plasmid link which will also turn into a yellow box. This time, let's look at the pop-up window:


As the instructions say, press the TAB key which will bring up a list of all objects of the class Plasmid


Double click on pDC206-13, which will then be written into the yellow box. Press ENTER.

Similarly, fill in the concentration field by typing in a number eg. 0.8. Finally, fill in the container field with the name of a container. Our database doesn't contain any containers for DNA_samples, so let's type in a name "YW T-DNA constructs'. You can finish the update by holding down the right mouse button and choosing 'Save'. The final window should look like this:


Note that we explicitly created an Experiment object above.  If we double-click on the Experiment YW38, the YW38 experiment will pop up


The link back to the DNA_sample was automatically created because of the XREF definition in the Experiment model. We can fill in the other fields using right-mouse -->update, so that they look something like this:


The author was chosen from using the TAB key, while the Title was just typed in. Note that although the Experiment model does include an Image field, it would be redundant to put a link to the plasmid map here, since the pDC206-13 Plasmid object already contains a link to an Image object that shows the plasmid map. This illustrates an important point of databases: avoid recording the same piece of information twice in the database.

D. Entering data using text files.

Sometimes, it is more convenient to enter data into text files and read it in, rather than creating each object using the graphic interface as we did in the previous section.  In particular, if you have many objects of the same type that differ only in one or two fields, it may be best to create one as a template, and save that into a .ace file. Then, you can make copies of the object and read them back in.

Suppose that in experiment YW38, four plasmid preps had been done, generating four DNA_samples. The first DNA_sample created above could be used as a template as follows:

Open the YW38.pDC206-13 object and choose right-mouse --> Export Data. Save this file as DNA_sample.ace. The file should look like this when you read it into the text editor:

// data dumped from tree display

DNA_Sample : "YW38.pDC206-13"
Experiment     "YW38"
Plasmid     "pDC206-13"
Conc_ug_ul     0.800000
Box     "YW T-DNA constructs"

To create the other three DNA_sample objects, just use copy and paste, and then edit each object. The final file shoud contain the three new objects, which might look something like this:
// data dumped from tree display

DNA_Sample : "YW38.pDC-CHIT-26"
Experiment     "YW38"
Plasmid     "pDC-CHIT-26"
Conc_ug_ul     1.0
Box     "YW T-DNA constructs"

DNA_Sample : "YW38.pDC49-4"
Experiment     "YW38"
Plasmid     "pDC49-4"
Conc_ug_ul     0.5
Box     "YW T-DNA constructs"

DNA_Sample : "YW38.pDC230-12"
Experiment     "YW38"
Plasmid     "pDC230-12"
Conc_ug_ul     0.9
Box     "YW T-DNA constructs"

In this example, each DNA_sample has a unique name, referring to the plasmid that is contained in the DNA prep, and a unique concentration. All of the samples are in the same box, and are done as part of experiment YW38. You can read the file in by choosing Edit --> Read .ace file, and choosing the file from the 'Open ace File' menu. (This is exactly what we did when we read in example.ace at the beginning of this exercise.)
You will see that YW38 now contains all four DNA_sample objects:


Similarly, each of the three Plasmid objects will now have a link to the new DNA_sample objects.