Working with Clusters
The analysis modules available in MeV subdivide genes or samples into clusters by unsupervised techniques, statistical methods, classification algorithms, or biological relationships. These partitioned sets of elements are then individually displayed in one of the standard cluster viewers.
Storing Clusters and Using the Cluster Manager
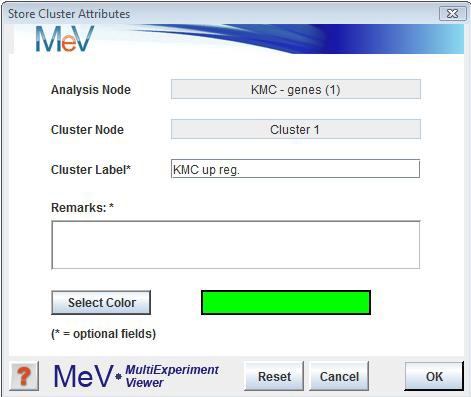
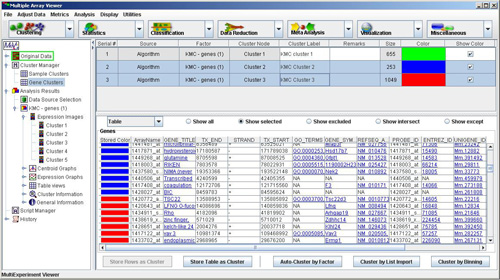
Clusters of interest can be stored to a repository from the basic cluster viewers. Highlight the cluster of interest by clicking it, then in the right click menu select . Once a cluster is stored, the node on the result navigation tree will contain a list of stored clusters. Gene clusters and sample clusters are maintained in separate spreadsheets which are viewable from the Cluster Manager node. When storing a cluster to the repository an input dialog is presented which allows for three user defined fields to be associated with the cluster. Two optional text fields are used to capture a cluster name and a description of the algorithm or interesting features of the cluster. The third user input is a color used to identify genes or experiments which are members of the clusters. These colors can be tracked while performing analyses so that clustering consensus can be established. No two clusters may use the same identifying color.
The cluster tables contain the following columns:
-The Serial Number is a unique number which is sequentially assigned to easily identify a particular cluster.
-The Source field describes whether the cluster source was an algorithm, a cluster operation, or some other means of selecting a group of elements.
-The Algorithm Node or Factor field identifies the algorithm used, if the source was an algorithm, and includes the navigation tree result index (in parentheses).
-The field identifies the specific cluster node under the Algorithm Node from which the cluster was stored.
-The is an optional user defined name for the cluster.
-The field can be used to contain details about the process used to create the cluster or specific features of interest in the cluster.
-The field shows the number of elements in the cluster.
-The displays the user defined color for the cluster. If you click the color box a screen will show that allows you to change the color if you wish.
-The check box allows you to show or repress the displayed color. This option can be useful when visualizing cluster intersections in viewers.
Selecting only one cluster color to view can simplify interpretation.
Users have 6 options for display types and 5 options for the data to display.
Four MeV viewers are accessible from the Cluster Manager:
- : This option displays a table in the Cluster Manager showing every available annotation for each gene or sample included.
- : This option displays a heatmap in the Cluster Manager showing expression values for each gene and sample included.
- : This option displays a graph in the Cluster Manager showing expression values for each gene and sample included.
- : This option displays a graph similar to the Expression Graph, but individual lines are omitted. Instead, a single mean expression line is displayed and bars representing standard deviation at a particular sample/gene are shown.
- : This option displays a venn diagram in the Cluster Manager showing the overlap between 2 or 3 clusters. A p-value is represented given a null hypothesis of zero membership correlation between clusters.
- : This option displays charts in the Sample Cluster Manager showing expression values for each gene or gene cluster expressed over the set of selected sample clusters.
Five data options are available based on the clusters selected.
- : All elements in the loaded data are shown, regardless of cluster membership.
- : All elements belonging to of the currently selected clusters are displayed.
- : All elements that belong to of the currently selected clusters are displayed.
- : All elements belonging to currently selected cluster are displayed.
- : All elements belonging to of the currently selected clusters are displayed.
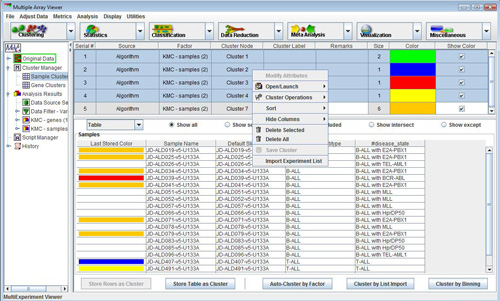
The spreadsheet allows single or multiple row selection (by holding down the control key when left clicking the mouse). A right click with one or more rows selected will display a menu that contains several options detailed below.
Double-clicking on a cluster will open the dialog.
-The option allows the user to modify cluster label, remarks or the cluster color by displaying the input form with the current settings displayed.
-The menu has two options. will pull up the source cluster viewer. The second option is which opens a new multiple array viewer containing only the data from the selected cluster or the union of the members of several clusters if several clusters are selected.
-The menu allows for three possible operations to be performed if two or more clusters are selected. combines the members of the selected clusters and stores the resulting cluster on the list. Elements represented in more than one cluster of the input clusters are only represented once in the output cluster. The operation takes the elements from two or more clusters and produces a cluster containing all elements which are common to all clusters. The XOR (exclusive OR) operation produces a cluster containing elements that are members of one cluster or another but not members of more than one cluster.
-Options also exist to delete selected clusters or all clusters in the list as well as to save a selected cluster to a specified file.
Deleting clusters can be performed by selecting a single or multiple clusters in the cluster table or by selecting delete public cluster option from the menu in the viewer which contains the cluster.
You can also to a tab-delimited text file. Selecting this option from the right-click menu will cause a file chooser to appear. Select a file name and a place to save row/column data, log ratio expression values, and (optionally) Cy3 and Cy5 values for each gene in the cluster. Selecting will allow you to save the genes in all clusters in a similar way. This option is available from the cluster table as well as in the viewer.
One additional option is the option to delete all gene clusters or sample clusters. These global operations which effect all colored clusters is selected from the menu in the multiple array viewer by selecting or or can be done from the cluster tables.
The allows one to create a cluster based on supplied identifiers. For example, if you wish to make a cluster out of specific genes that you know are important, you can paste those genes into the dialog box and the cluster will be created out of those specific genes you pick. Identifiers belonging to the cluster are pasted into the text area. The drop down list indicates the type of annotation being loaded. After searching for matches, the List Import Result dialog will be displayed. An intermediate dialog will appear to display the results of the import and to allow you to select a subset of the identified elements before saving the elements as a cluster. After review of identified elements a will be presented so that a cluster name, description, and color can be defined for the new cluster. This dialog also displays a table that contains matching elements. The rows in the table can be selected to remove unwanted entries before hitting the button to store the items to a cluster. The bottom section of the dialog also reports which indices were found and which were not found in the loaded data set.
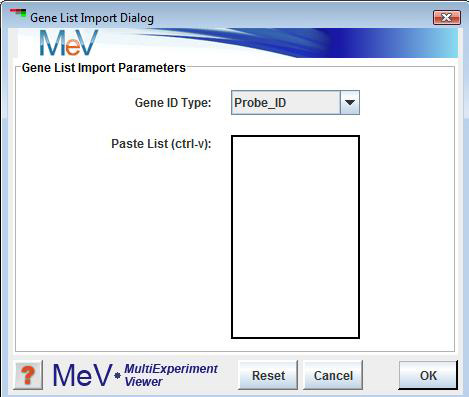
The List Import Dialog is used to import gene or experiment identifiers for the purpose of imposing or creating clusters within the loaded data set. This enables the user to mark genes or experiments of interest for tracking during analysis.
Clustering by Gene List Import
Import ID Type
This drop down list contains the gene or experiment annotation types in the loaded data set. Select the annotation type that corresponds to the input ID list.
Paste List (Text Area)
Paste the ID list into the text area by left clicking the mouse in the text area and then using the ctrl-v key strokes to paste the identifiers in the list. Reset will clear the selections on the dialog.
Once the dialog is dismissed, if genes or experiments were found in the data set that match the input parameters, a cluster attributes dialog will be presented to collect cluster attributes including the desired cluster color.
Automatic Identifier Clustering Dialog
The Import Dialog is used to import gene or experiment identifiers for the purpose of imposing or creating clusters within the loaded data set. This enables the user to mark genes or experiments of interest for tracking during analysis.
Import Parameters
Select one or more annotation type from the left list and click the '>>>' button to move it to the list of annotations to be used.
The annotations types that you have selected will be used to create clusters. Each unique annotation in each annotation type will be used to create a distinct cluster. Only samples (or genes) that have identical annotations for the specified type will be placed in the same cluster.
Binned Clustering Dialog
The Import Dialog is used to import gene or experiment identifiers for the purpose of imposing or creating clusters within the loaded data set. This enables the user to mark genes or experiments of interest for tracking during analysis.
Import Parameters Using the combobox, select the annotation type that contains the numerical values that you wish to cluster.
Fill in values for the upper and lower limits that are to contain the desired cluster.
The upper and lower limits that you have input will be used to create a cluster. All samples (or genes) with a numerical value for the selected annotation type within the specified limits will be placed in a single cluster.


