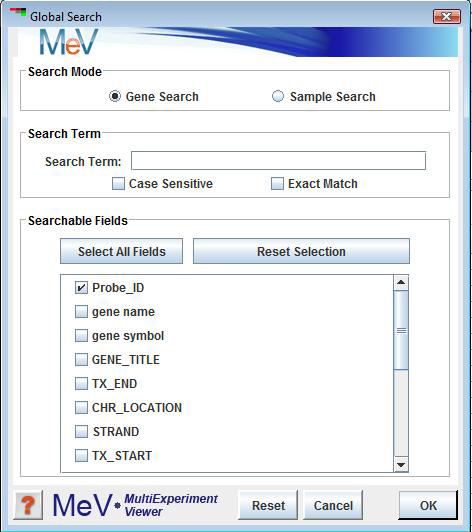
Search Initialization Dialog
The Search feature permits the user to search the data for genes or samples for a search term given search criteria. Once the search is complete, the elements are returned in a table. Navigation shortcuts provide a means to open cluster viewers that contain the elements found in the search.
Select . The search initialization dialog allows the option of finding genes or samples. The search criteria include a search term, a selection to make the search case sensitive, and a selection to permit the search term to be an exact match or simply a contiguous portion of a larger annotation term. This is especially good to use when there is annotation and you want to find specific types of genes.
The options permit searching for genes or samples.
The text field permits the input of the term to search for within the gene or sample annotation. The option insures that all matches contain the search term including matching the case of each letter. The option insures that all matching annotation contains the search term and no extra characters. If this option is in the default (off) mode then the annotation matches only need to contain the search term within the annotation. (e.g. If the search term is proton then valid matches could be proton transport, proton pump, or any other annotation term containing proton.
lists the annotation fields that can be searched and permits the selection of specific fields. Note that the fields are gene or sample specific and are tailored to the loaded annotation. Selection of specific fields will permit the you to target the search. The Select All Fields and the Reset Selection are used to assist in annotation field selection.
The search result is presented in a new window that is split into an upper section that contains the list of genes or samples identified as matching the search criteria and a lower section providing shortcut links to cluster viewers that contain the identified samples or genes.
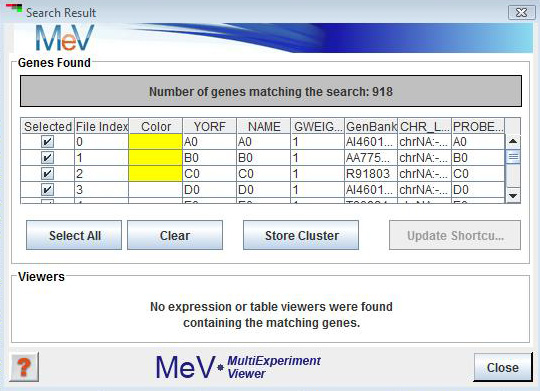
The upper panel displays the list of genes or samples retrieved by the search. The list of genes or samples found could include some entries that not of interest. Elements in the list can be deselected using the checkboxes. Clicking on the Update Shortcuts button will produce a new search result window with just the previously selected entries and the associated viewer shortcuts. This allows one to prune unwanted elements out of the search result. The Store Cluster button will store the selected items as a cluster and assign a user selected color. Note that this is one method to help identify the elements found during the search within the cluster viewers.
The , in the top area of the window, reports the number of search matches and provides a table listing all matching elements. This section also provides button shortcuts to select all or clear the selected elements in the table. The Store Cluster button saves the selected elements as a cluster and assigns a color to mark the selected elements (genes or samples). As always the marking of genes or samples can aid in tracking these elements during analysis. The Update Shortcut button provides a new Search Result window with updated viewer shortcuts (described below) that correspond to only the selected elements in the initial search. Note that by selecting subsets of the results and updating the search result report you can hone in on very specific subsets of elements.
The section provides a means to jump to cluster viewers containing the elements matching the search criteria found in the result table. The tree structure on the left lists analysis results that contain some or all of the matching genes or samples. Click on the analysis of interest within this panel to update a list of Expression and Table Viewers containing the elements. Selecting viewers from the or list causes the main display of MeV to jump to the selected cluster viewer. This is an important feature to help track specific genes or samples.
The allows one to create a cluster based on supplied identifiers. To import genes or sample lists, please refer to the explanation previously given.
Matching Results Two lists are provided to account for all input identifiers. The list segregates the input identifiers into those that had matches in the data set and a separate list for those identifiers not found to match elements in the data set.
A Note on the Results It can be the case that the resulting list size might not match the number of identifiers entered. It might be that some identifiers didn't match an element in the input data or it can be the case that there were multiple genes in the data set that matched a particular identifier.
This feature allows the import of additional sample annotations. Often these would be more descriptive sample names that distinguish the samples based on a study factor, condition, or some measured variable. The sample annotation file should be a tab-delimited text file containing one header row for annotation labels (field names).The file may contain multiple columns of annotation with each column containing a header entry that indicates the nature of the annotation. The annotation for each sample is organized in rows corresponding to the order of the loaded samples. If annotation is missing for a sample the entry in that sample row may be left blank. Please see the manual appendix on file formats for more information and a small example.
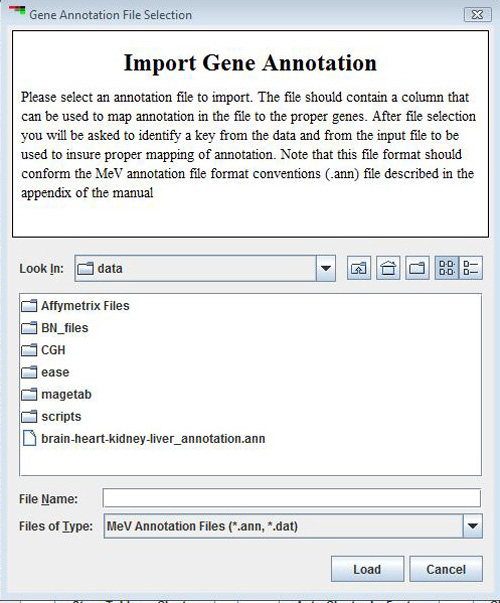
The Append Gene Annotation feature is used to append additional gene annotation from an MeV style annotation (.ann, or .dat) file. The annotation file format is described in detail in the File Format Appendix. The main parameter selection dialog permits the selection of two key fields to be used to map the annotation from the input file to the proper gene already loaded in MeV. One key should be specified for the currently loaded data. This key should be a gene identifier of some sort and should correspond to the annotation field selected as the file’s primary key. The values of these annotation keys is used to map or correlate gene annotation in the file to the loaded genes. The lowest section of the parameter dialog specifies the annotation fields from the file to import. Import status will be reported and an entry that logs the import will be added to the history node’s history log.
The annotation file format is described in detail in the File Format Appendix. The dialog presents selection lists for two keys used to map annotation to genes. The first key should be a primary identifier of genes in the loaded data. This could be UID or some current annotation field. The other key represents a column from the annotation file to be used as a key identifier.
These two keys are used to map or associate annotation from the file to the proper gene in the loaded data set. It is not imperative that all loaded genes be present in the annotation file and it is possible that the annotation file could have many more indices than those found in the data set. Genes that are not found in the input annotation file will have empty annotation for the imported annotation fields.
Gene Identifier
This drop down list contains the gene annotation types currently loaded. Use the drop down list to indicate the key to use to map genes to annotation.
Corresponding Gene Identifier from Input File
This drop down list contains gene annotation fields from the input file. Use the list to select a key to use to map annotation to genes. Note that in order to append annotation the two selected keys should represent overlaping lists of annoation. During the import these two keys are used to matche annotation to genes.
Fields to Append
This lowest section of the dialog is used to select annotation fields to import. By default, UID, R, and C, fields are not selected if present. At least one field should be selected for import.
For a description of the contents of the Gaggle submenu, please see section 11.2.