Cytological techniques were developed to obtain information on chromosomes - number, structure and behaviour during cell division. The basic principles applied are generally similar for all species. However, some procedures are modified for different species and to highlight particular features of the chromosomes. Good preparation of the cells is required for good results. Attention to detail is necessary at every step, starting with the selection and collection of material. Seeing anything at all requires good technique.
Collecting material for study requires an understanding of the cell cycle. If we want to observe chromosomes, picking cells in interphase or prophase isn't going to help much. Similarly, if we want to observe meiosis, we can't take a sample from a leaf. One of the first considerations when collecting a sample is whether you need to observe somatic cells or germline cells. Somatic cells are the majority in any organism, and divide only by mitosis. On the other hand, germline cells are only found in certain reproductive structures, and divide by meiosis.
Cytologists can identify the best tissues to observe with a measure called mitotic index (MI). The mitotic index is a ratio of the number of actively dividing cells in a sample to the total number of cells. If you can select a tissue that has a high mitotic index, it will be much easier to find and observe dividing cells.
What about using cells from tissue culture? Isn't that easier?
We don't tend to use cells from tissue culture because over the years that they have been cultivated, they accumulate a lot of genetic abnormalities, including substantial duplications or deletions. If we tried to count chromosomes, the likelihood that we would get an incorrect number is high. This is especially not useful when we want to test the effect of some treatment and make sure it doesn't affect the chromosomes.
a. Animal mitotic cells. The most common sources are skin, bone marrow, and white blood cells. Embryos also provide a good source of cells with a high mitotic index.
Example: Flourescent images of mitosis in sand dollar embryos
Early embryogenesis - http://www.cellimagelibrary.org/images/15784
Slightly later in embryogenesis
http://www.cellimagelibrary.org/images/15797
http://www.cellimagelibrary.org/images/15798
VIDEO: Mitosis in
Drosophila embryo
from: http://en.wikipedia.org/wiki/Mitosis
b. Plant mitotic cells. The meristematic tissue found in expanding leaf
tips, cambium and root tips is the best source of actively
dividing cells. Root tips are readily available and can be
sampled from germinating seeds or potted plants.
See image at http://www.vcbio.science.ru.nl/image-gallery/show/print/PL0097
Image displayed by
hypertext link from
http://www.vcbio.science.ru.nl/en/virtuallessons/cellcycle/intro/
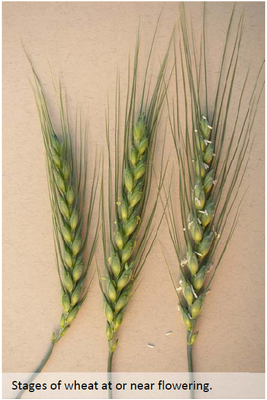
When looking at meiosis, the only option is to collect cells from reproductive structures. In plants, the best way to observe cell is meiosis is to sample from the pollen mother cell (PMC). Luckily, with many plants we can collect the entire inflorescence and take multiple samples.
When you collect a spikelet like the one above, each individual floret is at a different stage of meiosis. The older ones, near the bottom, might be just about ready to flower. The newer ones, near the top, will still be undergoing meiosis.
Once you have collected some sample material appropriate for the experiment that you're doing, it needs to be pre-treated before fixation and staining. In general, pre-treatment causes physical changes in both cytoplasm and nucleus to assist in revealing the morphology of chromosomes. There are specific pre-treatments for specific purposes, and different pre-treatments for different species. Pre-treatment accomplishes goals like:
When creating an experiment, it would be wise to look at the literature to find what works best for your purposes and the species you're working with. We'll present two common pre-treatments here, one physical and one chemical.
Immersing samples in an ice bath or refrigerator is easy, affordable, and accessible. Generally, samples are treated for 12-24 hours, with the following effects:
There is one drawback: ice water treatments can cause chromosomes to clump together, making it difficult to get a clear count.
This method works particularly well for barley, rye, and certain species of wheat.
With chemical pre-treatments for plants, before the treatment is applied, the cell wall needs to be removed. Two options are available here: either the cell wall is digested (with a protease or cellulase), or by acid hydrolysis. Once the cell wall has been removed, the chemical pre-treatment can be performed.
Colchicine is one of the most widely-used pre-treatments for both plant and animal tissues. You may have heard colchicine described before as a "mitotic spindle poison". It certainly does interrupt the formation of the mitotic spindle, and is extremely effective at halting cells at metaphase. In addition:
One caution when working with chemical pre-treatments is to not allow yourself to come into direct contact with them, even by inhaling.
Fixation is the stage where we try, as best as we can, to keep the cell in the same condition as when it was alive. While we need the cell in a certain stage, we don't want any swelling, shrinking, or structural change of any elements in the cell. Several factors influence what we might choose to do for fixation, including:
...and many others. Without the right series of steps, the
structures that you want to observe will a) be too distorted to be
any help to you, or b) not be hardened enough to even take a
stain. Here are some guidelines to follow when choosing how to fix
a sample.
| 1. The fixative should be carefully chosen for the tissue being studied. | |
| 2. Small organisms may be fixed
whole eg. algae but larger one should be cut in smaller
pieces to allow rapid and uniform penetration of
fixative. The example shows single-celled and multicellular microorganisms from pond water. Since each cell can be surrounded by fixative, and cellular volume is small, fixation can be highly efficient. from http://www.microscopy-uk.org.uk/mag/artoct00/fixation.html |
 |
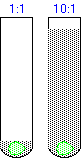
| 3. The volume of the fixative
should be approximately 10 to 12 times that of the
tissue being fixed. Remember, the goal is to get the tissue to equilibrate with the treatment. At a 1:1 volume, the final concentration of the treatment in the tissue will be half the original concentration. By using a higher ratio of treatment to tissue volume, the dilution of the treatment becomes insignificant. |
 |
| 4. Tissues which are waxy, cutinized or suberized may present technical difficulties especially for slower penetrating fixing agents. In plants, the epidermis is usually covered with a hydrophobic cuticle layer that prevents aqueous reagents from entering tissue. Hairy surfaces or air trapped in the material also interferes with the action of fixing agents. Dipping in alcohol before fixation may help or evacuation to remove air when material is in fixing agent. |  from http://preuniversity.grkraj.org/html/3_PLANT_ANATOMY.htm |
There are various different fixatives, but most operate under
the same principle. They contain acid, to
denature proteins. In plants, acid treatment also partially breaks
down the cellulose in cell walls, making it easier to get single,
isolated cell layers. Fixatives also typically have alcohol
to prevent the swelling of the cell caused by the acid. Different
fixatives will have different types and proportions, but the idea
is the same.
Example: Farmer's fixative - 25% acetic acid (HOAc), 75% Ethanol
(EtOH)
If you look at any tissue through a microscope, it will be mostly transparent. You won't see much detail, other than cell walls in plants. The purpose of staining is to create optical contrast so that chromosomes or other cell structures can be seen through the microscope. There are specific stains for specific cell structures.
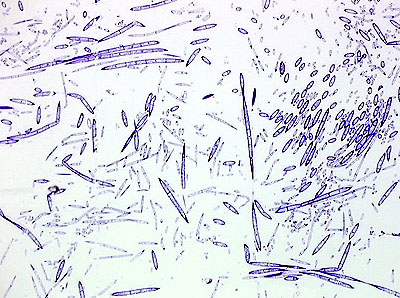
For barley and wheat chromosomes, the aceto-carmine stain is used. Roots are transferred to the stain after pre-treatment, since the stain also acts as a fixative.
Another common stain in cytogenetics is called Feulgen stain. The stain is specific for DNA in chromosomes and can be used with a microspectrophotometer for measuring DNA content.
The material is spread on the slide and stained using a drop of stain. A cover slip is added and the slide is heated gently. The material is then spread by pressing or tapping the cover slip with thumb or needle. It is important not to allow lateral movement of cover slip to occur as this causes the cells to be distorted. A temporary preparation may be sealed with nail polish or paraffin wax.
To make the slide permanent, put it on a block of dry ice which causes it to freeze from bottom up. The cells stick to the slide and the cover slip can be removed with razor blade. The water content of cells must be replaced with a mounting medium, which are resins such as Canada Balsam.