A color map is a list of colors corresponding to the image pixel values. In DNA/GUI, no matter what the range of an image's pixel values, the displayed representation of that image is scaled to a pixel value range of 0 to 255. While the majority of graphics workstations running DNA/GUI allow 256 colors, only about 200 are actually used for the image; the remainder are dedicated to the various menus and outlines. Thus a displayed image with the full range of 256 different pixel values must be mapped to the available 200 colors.
The 200 colors can be any arrangement of hues and shades; but a menu of some 25 arrangements is already available for the user's convenience. Such an arrangement is called a colormap. Other arrangements may be designed, but some understanding of the program code would be necessary; it is beyond the scope of this User's Guide. The default colormap can be seen in the colorbar just to the right of the image. It is read from top to bottom (highest to lowest); the top color corresponds to a pixel value of 255 (most intense), while the bottom color corresponds to a pixel value of 0 (least intense). The default colormap is a continuous gray scale, white to black.
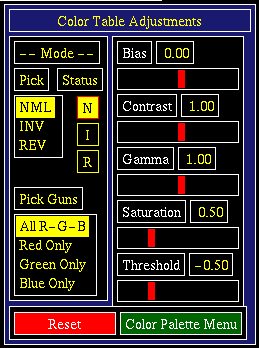
The installed color map may be replaced with another map or modified in several ways described below. The menu for making adjustments appears in the lower right of the screen and is shown in Figure 5.1 below. This menu consists of two groups of buttons, five sliderbars, [Reset] (red) and [Color Palette Menu] (green). [Reset] simply resets the installed colormap to the colors before any manipulations took place. [Color Palette Menu] pops up the Color File Browser, from which an alternate color map may be chosen.

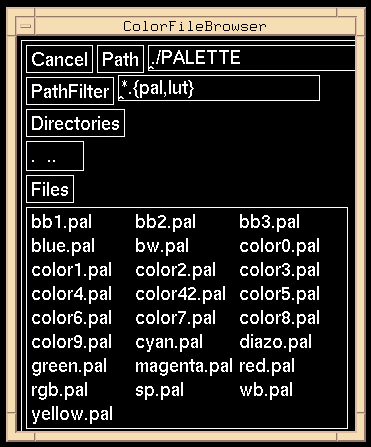
A new colormap is selected via the Color File Browser, which appears in Figure 5.2 below. The Color File Browser may be popped up in two ways. The easiest way is to click the green [Color Palette Menu] button in the Color Adjustments Menu to the lower right of the screen. The other way is via the Options Submenu: from the Commands Menu, click [Options] ; then click the [Color Map] in the Options Submenu. Whichever way is chosen, the Color File Browser appears, showing the names of the available colormaps. The suffix .pal stands for "palette". Click on a color palette and notice the change in the image and the colorbar.

The supplied colormaps are represented in colorbars as shown in
Appendix A.7
The bias, contrast, gamma, saturation, and threshold sliderbars may be used to gradually alter the installed color table. To use one of the sliders, place the pointer over the bar in one of the sliders. While depressing MB2, move the bar left or right and note the gradual color changes in the colorbar and, if present, any image. Releasing MB2 freezes that slider until that slider is again selected or the color adjustments menu is reset (note [Reset] at the bottom). The values shown are simply weights used to change the installed color table; the user need not be concerned with these values. The sliderbars affect only the installed color table; the image pixel values are not changed in any way. The bias, contrast, gamma, saturation, threshold names are technical terms; details of these terms are beyond the scope of this User's Guide.
The normal, invert, and reverse modes are different ways of rearranging the installed color table. The normal mode is simply the way it is arranged when first installed. The invert process takes each color-table intensity value (range 0.0 to 1.0) and subtracts that value from 1.0. The invert effect is for whites to become blacks, reds to become cyans, blues to become yellows, etc. The reverse mode switches the positions in the color table. That is, if the first position represents the lowest intensity value and the last position the highest intensity value, the reverse effect causes the first position to correspond to the highest intensity value and the last position to be the lowest intensity value. Successive mode changes create different states. For example, inverting twice in a row returns the status to normal. For another example, successive choices of invert and reverse leave the status as inverted and reversed. Note that the mode selection buttons are to the left while the current status appears to the right.
When any slider or sliders are moved, the color table intensity values are changed. As a default, all three guns (red, green, blue) are affected the same way. However, selection of any of the individual red, green, or blue guns in the "Pick Guns" menu means that only the selected gun will be affected by subsequent slider movements or by mode changes. The choices are all three guns OR any one of the three. The current version of this program does not allow for any two.
Forward to Chapter 5, section 5.2