| Contents | About the Program |

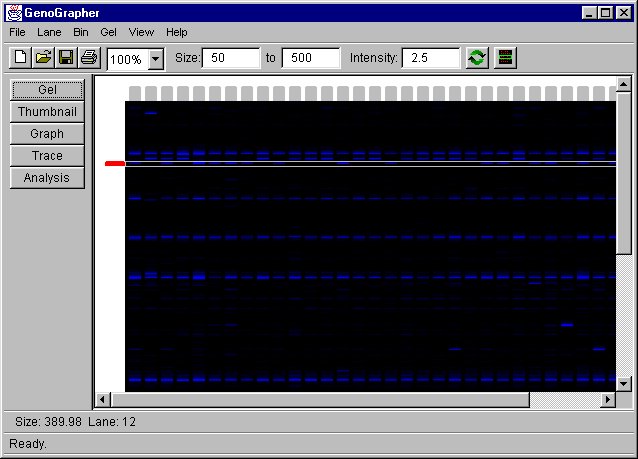
Displays the gel. The gel is recreated from the lanes. Since the lanes were tracked, one the intensity at the center of the lane is shown. Also, the tracking has the affect of straightening the lanes. Also, unlike a true gel, the lanes are displayed based on size. In a real gel, the same vertical position may represent two different sizes in different lanes. This is not the case with the gel displayed here. Since it is sized, all of the lanes are perfectly aligned (assuming that they were sized accuretly). Moving the mouse over the gel will give the size in bp of that position and the lane. If the lane header is pointed to, information about the lane will be displayed at the bottom of the screen. Finally, if a bin is pointed to, the location and range of that bin will be displayed.
The gel view allows the user to manipulate bins. A bin can be added to the gel in several ways. Clicking the mouse button on a blank spot (a place not already covered with a bin) in the gel will result in a bin being added at that location. It will have a default range. Also a bin can be created by dragging the mouse down. It's top border will be where the mouse was first depressed, and the bottom border will be where the mouse was released. This will only work if the mouse is dragged "down," towards the bottom of the screen. Dragging "up" will not work. Finally a bin can be added using the Bin Dialog Box.
A bin can be adjusted with the mouse. The borders of the bin can be adjusted by dragging them. When the mouse is over the border, it will change to indicate that the border can be moved. Specifically, it will change to the systems pointer for resizing windows. To move a bin, simply drag it. When the mouse is in the bin, it will change to a "move" pointer. Dragging at that time will move the bin. Note that this should be done on the gel. Trying to move the bin tab, the little grey box on the left, will not work. Sometimes it is difficult to point to the bin or the bin border. In that case, the Bin Dialog Box shoud be used. This dialog also allows one to change the way a bin is scored, as well as delete bins.
A lane can be selected by double clicking on the lane head. It will then be marked as selected. If lanes are selected, then the thumbnail and graph will display only the selected lanes. Also all of the selected lanes can be deleted by selecting "Lane|Delete Marked Lanes..." A bin can be selected by simply clicking on the bin tab on the left of the gel. (The selected bin is then colored red.) The selected bin will be used when the thumbnail or graph is selected. Note: the thumbnail view allows the bin displayed to be changed, but if the graph is then selected, it will use the bin selected in the gel, not the one displayed by the thumbnail view.
The size range displayed and the intensity of the image can be adjusted by using the controls at the top. Once the values have been entered, hitting "Enter" in one of the entry boxes will cause the changes to take affect. Also, the "Redisplay" button can be pushed. Both have the same affect. When adjusting the size, the size of the image displayed on the screen does not change, but the size range it represents does. For example, the user may wish to set the size range to a small value if he or she spots two markers that are very close to eachother. Also, varying the intensity may make some markers visible. At high intensisties, weak signals become apparent, but the strong ones are washed out, so varying the intensity will allow both classes to be recognized.
The size of the display can be adjusted using the zoom selector. This does not change the size range displayed in the gel, but it does change the size of the image on screen. Warning: Some of the images can get quite big and the computer can run out of memory. See the section "Memory" in the contents. Moving from 100% to 200% will quadrouple the memory requirements. The exception to this is the zoom "To Bin" and "Full Gel" options. They do not change the size of the displayed image, but they do change the size range displayed.
The gel can be saved as a PNG graphic file format, by selecting "File|Export..." Only the gel itself will be saved to the file, not the bins. PNG is a somewhat new graphics format, but most newer programs shoud support it, including Microsoft Office 97 and Corel WordPerfect Suite 8. If the ".png" extension is not added to the file dialog, the program will automatically add it.
| Contents | About the Program |