BIRCH

return to tutorials

TUTORIAL: Adding features to BioLegato


   July 12, 2022


REFERENCES

BIRCH Administrator's Guide: Adding binaries, scripts and libraries

PCD Language Summary


This tutorial is an introduction to the basics of how BioLegato works, and how to change or add features to a BioLegato application. It assumes basic knowledge of Unix commands on Linux or MacOSX, and knowledge of how to edit text files in a text editor. Examples have been chosen so that knowledge of biology is not required.

PLATFORMS: This tutorial has been tested on Linux and MacOSX. While it may be possible to run using Windows Subsystem for Linux (WSL) it has not been tested on that platform.

Goal: Learn to add new programs to an existing BioLegato application

1. Download a standalone copy of BioLegato

This tutorial can be done in any directory, but for demonstration purposes we'll assume that you will be working in a directory called $HOME/biolegato.

cd
mkdir biolegato
cd biolegato

go to your $HOME directory
create the biolegato directory
go into your biolegato directory

Download the current version of BioLegato, including source code and compiled jar files, at
https://home.cc.umanitoba.ca/~psgendb/birchhomedir/FTP/biolegato/biolegato.tar.gz. and save it in your biolegato directory.

Now, uncompress and de-archive the directory tree.

gunzip biolegato.tar.gz
tar xvfp biolegato.tar

decompresses the file
extracts the directory tree, preserving permissions and timestamps


Verify the contents of the biolegato directory by typing ls -l

drwxrwxr-x 4 psgendb psgendb     4096 Nov 28  2021 bioLegato.1.0.6
-rw-rw-r-- 1 psgendb psgendb 35983360 Jul  5 13:03 biolegato.tar


You may delete the .tar file now or any time you wish.

cd bioLegato.1.0.6
ls -l


The contents of bioLegato1.0.6 should look like this:

lrwxrwxrwx  1 psgendb psgendb   21 Jul 24  2014 biolegato.jar -> src/bin/biolegato.jar
lrwxrwxrwx  1 psgendb psgendb   22 Jul 24  2014 biopcdedit.jar -> src/bin/biopcdedit.jar
lrwxrwxrwx  1 psgendb psgendb   18 Jul 24  2014 biopcd.jar -> src/bin/biopcd.jar
-rw-rw-r--  1 psgendb psgendb 9691 Jul 14  2018 ChangeLog.html
lrwxrwxrwx  1 psgendb psgendb    9 Jul 24  2014 docs -> src/docs/
lrwxrwxrwx  1 psgendb psgendb   19 Jul 24  2014 gde2pcd.jar -> src/bin/gde2pcd.jar
lrwxrwxrwx  1 psgendb psgendb   17 Jul 24  2014 image.jar -> src/bin/image.jar
lrwxrwxrwx  1 psgendb psgendb   24 Jul 24  2014 manpage.txt -> src/Core/src/manpage.txt
lrwxrwxrwx  1 psgendb psgendb   21 Jul 24  2014 pcdcanvas.jar -> src/bin/pcdcanvas.jar
-rw-rw-r--  1 psgendb psgendb 1802 Jun  4 16:53 README_CreateNewVersion.txt
-rw-rw-r--  1 psgendb psgendb 1304 Mar 20  2015 README_CreateNewVersion.txt~
lrwxrwxrwx  1 psgendb psgendb   14 Jul 24  2014 README.txt -> src/README.txt
lrwxrwxrwx  1 psgendb psgendb   20 Jul 24  2014 sequence.jar -> src/bin/sequence.jar
drwxrwxr-x 12 psgendb psgendb 4096 Jun 11 14:45 src
lrwxrwxrwx  1 psgendb psgendb   17 Jul 24  2014 table.jar -> src/bin/table.jar
drwxrwxr-x 10 psgendb psgendb 4096 Jul  5 12:42 test


For today's tutorial we'll be working in the test directory.

cd test
ls -l


drwxrwxr-x 2 psgendb psgendb 4096 Jul  1 13:03 admin
drwxrwxr-x 2 psgendb psgendb 4096 Jul  1 13:05 bin-linux-x86_64
drwxrwxr-x 2 psgendb psgendb 4096 Jul  1 13:05 bin-osx-x86_64
lrwxrwxrwx 1 psgendb psgendb   14 Jul  1 12:03 blfiles -> script/blfiles
lrwxrwxrwx 1 psgendb psgendb   14 Jul  5 12:27 bltable -> script/bltable
drwxrwxr-x 4 psgendb psgendb 4096 Jul  1 13:08 dat
drwxrwxr-x 2 psgendb psgendb 4096 Jul  5 12:37 doc
drwxrwxr-x 3 psgendb psgendb 4096 Jul  1 12:08 java
drwxrwxr-x 4 psgendb psgendb 4096 Jul  4 15:49 local
-rw-rw-r-- 1 psgendb psgendb  477 Jul  5 12:42 README.txt
drwxrwxr-x 2 psgendb psgendb 4096 Jul  5 12:31 script


This directory tree is similar in structure to a complete BIRCH system.

directory
purpose
admin
 code to set environment variables and other settings
bin-linux-x86_64  Linux - binaries placed here will be included in $PATH
bin-osx-x86_64  OSX - binaries placed here will be included in $PATH
blfiles  wrapper script to run blfiles, a file manager implemented in BioLegato
bltable  wrapper script to run bltable, a simple spreadsheet implemented in BioLegato
dat  location of PCD files used to populate menus for each BioLegato application
doc  documentation
java  Java source code and Jar files for BioLegato
local  directory for adding BioLegato features on your local system
README.txt  describes contents of current directory
script  executable scripts go here. This directory is included in $PATH

2. Set environment variables

BioLegato typically uses applications such as text editors, web browsers, image viewers etc. to display files. The applications available vary from system to system. In the BIRCH system, these applications can be set from BioLegato, but here we'll have to set them manually.

Go to the admin directory and open the .source file appropriate for your system. For Linux, that would be admin/setblenv.profile.linux-x86_64.source.

BL_Browser='firefox'
BL_PDFViewer='evince'
BL_PSViewer='evince'
BL_TextEditor='nedit'
BL_Terminal='gnome-terminal -e'
BL_ImageViewer='eog'
BL_Document='oowriter'
BL_Spreadsheet='oocalc'
export  BL_Browser BL_PDFViewer BL_PSViewer BL_TextEditor BL_Terminal BL_ImageViewer BL_Document BL_Spreadsheet


Most of these programs are available on a typical Linux system. On your system, you might have to replace nedit with gedit, pluma, or whatever text editor you wish. For this tutorial, you need a text editor and a web browser.

On MacOSX, most common types of files can be opened using 'open', which chooses an application based on the type of file. Mac users will probably not have to make changes to setblenv.profile.osx-x86_64.source

Next, open script/blfiles, which is the wrapper script that runs blfiles. Part of this file is shown below:

#------------------------ BIRCH and BIRCH_PLATFORM ---------------
#
#  Set these two variables and everything else should work unchanged.
#
# In a full BIRCH system, these variables are set by getbirch as
# part of an install or update.

# Set BIRCH environment variable, on which everything else depends
BIRCH=/home/psgendb/java/bioLegato/test
export BIRCH

# Uncomment one choice for BIRCH_PLATFORM
BIRCH_PLATFORM="linux-x86_64"
#BIRCH_PLATFORM="osx-x86_64"
export BIRCH_PLATFORM

#-----------------------------------------------------------------

BIRCH has to be changed to the location of your test directory. For example,

BIRCH=$HOME/biolegato/bioLegato.1.0.6/test

BIRCH_PLATFORM tells which bin directory to add to the path, and also for loading the appropriate settings files, as described above. This example shows the setting for Linux. For OSX you would comment out the linux-x86_64 line and uncomment the osx-x86_64 line.

3. Run blfiles, a demonstration BioLegato application

Now, go to the test directory, and launch blfiles:

./blfiles &

The ./ tells the shell to look in the current directory for the blfiles script. This is actually a symbolic link to the blfiles, which is found in the script directory. The ampersand (&) at the end of the command runs the command in the background, which keeps the command line free for further use.

Hint: Choose File --> Refresh at any time to refresh the view of the current directory.


Next, we'll demonstrate a few of the programs in blfiles to illustrate how BioLegato works. Select README.txt. Choose File --> View File and click on Run. README.txt will pop up in the text editor specified in part 2.


View file is a BioLegato menu with no parameters, so this function runs immediately when chosen in the File menu. As examples of functions with parameters, we will look at compress and decompress.

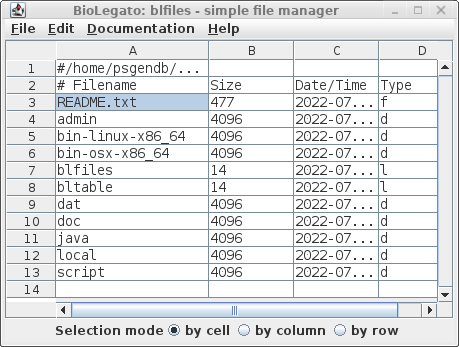
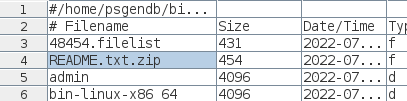
Make sure README.txt is still selected, and choose File -->  compress. Just to demonstrate, change Compression file format to zip. Click on Run.


You will see that the file has been renamed README.txt.zip, and has shrunken to 454 bytes from the original size of 477 bytes. (Admittedly, not much of a change.)


To restore the compressed file, run File --> decompress. Note that we don't have to tell decompress how the file was compressed. The decompression method will be automatically determined based on the file extension, in this case, .zip.


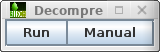
The original filename is restored, and the size is back to the original 477 bytes.


We can generalize the BioLegato work cycle as
1. Select data
2. Choose a program
3. Set parameters (if any)
4. Run the program
5. Work with the results.
The last point brings us to one of the most powerful aspects of BioLegato - the ability to send results to a new BioLegato instance, or ad hoc pipelining. To illustrate, select the script directory in blfiles, and choose File --> OpenDir - open a directory (folder).


The contents of the script folder now appear in a new blfiles instance. Each instance runs as an independent process, representing a branch in the pipeline. The user is able to work independently with each branch. As well, as long as output of one process goes to a new BioLegato instance, there are no dead ends. There is always something further that can be done with the data.  While this is a trivial example, the power of ad hoc pipelining is demonstrated in all other BioLegato tutorials. In particular, see Data Pipelining with BioLegato.

4. See how blmenu files implement BioLegato functions

Each BioLegato application has a separate directory

cd into the dat directory and type ls -l

-rw-r--r-- 1 psgendb psgendb 6037 Jun  4  2018 birch_black_ico.png
drwxrwxr-x 4 psgendb psgendb 4096 Jul  1 11:54 blfiles
drwxrwxr-x 5 psgendb psgendb 4096 Jul  5 12:12 bltable
-rw-rw-r-- 1 psgendb psgendb   46 Jul  1 13:08 README.txt


We see that this directory can accommodate any number of BioLegato applications. cd in to blfiles and type ls -l

-rw-rw-r-- 1 psgendb psgendb  154 Jul  4 16:57 blfiles.properties
drwxrwxr-x 5 psgendb psgendb 4096 Jul  1 11:54 PCD
drwxrwxr-x 2 psgendb psgendb 4096 Jul  1 11:54 seqcolors


blproperties

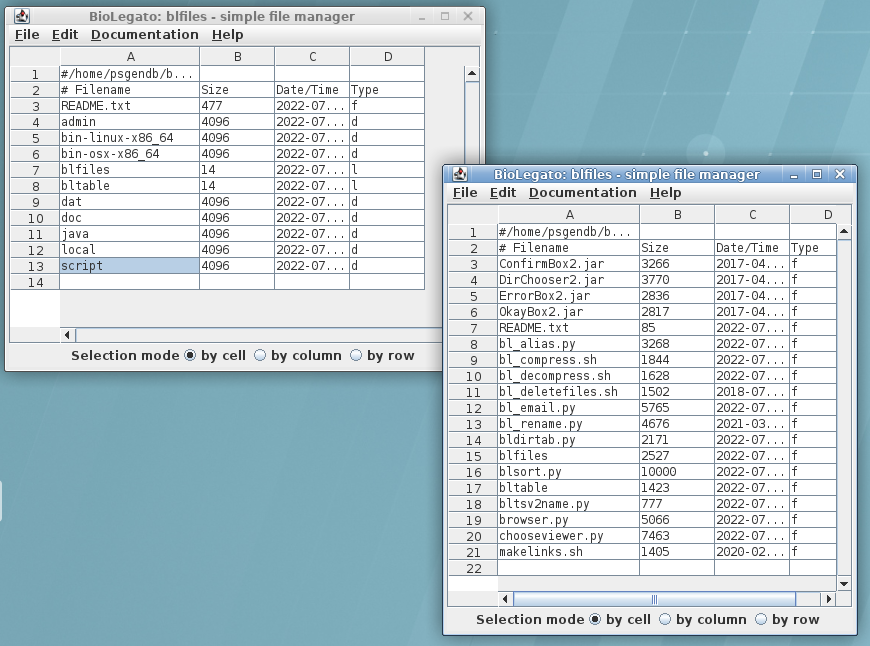
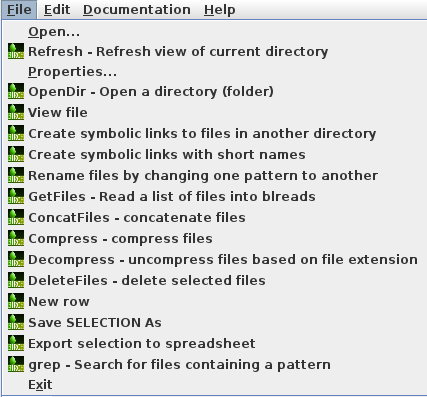
title=BioLegato: blfiles - simple file manager
pcd.menus.path=$BIRCH/dat/blfiles/PCD:$BIRCH/local/dat/blfiles/PCD
table.generic_headers=true
turtle=false


This is where we set the title for each blfiles window. pcd.menus.path specifies a list of paths in which blmenus files may be found. If there is a menu file in $BIRCH/local/dat/blfiles/PCD with the same name as in $BIRCH/dat/blfiles/PCD, the local copy of the file will supersede the other copy when blfiles is launched.

Menus are specified in the PCD directory tree

drwxrwxr-x 2 psgendb psgendb 4096 Jul  4 15:14 Documentation
drwxrwxr-x 2 psgendb psgendb 4096 Jul  1 11:54 Edit
drwxrwxr-x 2 psgendb psgendb 4096 Jul  4 17:05 File
-rw-rw-r-- 1 psgendb psgendb   29 Jun 30 17:47 pcd_order


Creation of dropdown menus is as simple as creating a subdirectory with the PCD directory. When blfiles starts, it will see these three directories and create three dropdown menus: Documentation, Edit and File.

The pcd_order file specifies the left to right order of these files in blfiles.

pcd_order
blfiles
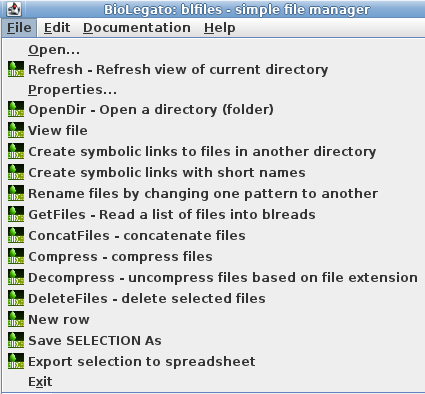
File
Documentation
Edit
Help


This example shows that BioLegato overrides placement of the File and Edit menus, which are hard-coded such that File and Edit are always the left most menus. The rationale for this design decision is that File and Edit are almost always the left most menus in software. So the rule is File, Edit, and then all other menus in the order listed in pcd_order.

Each dropdown menu has a directory for its blmenus files

For example, adding a new function to the File dropdown menu is as simple as creation of a new .blmenu file in the File directory.

-rw-r--r-- 1 psgendb psgendb 1017 Jun 30 19:42 Compress.blmenu
-rw-r--r-- 1 psgendb psgendb  895 Jul  4 17:14 ConcatFiles.blmenu
-rw-r--r-- 1 psgendb psgendb  803 Jun 30 19:42 Decompress.blmenu
-rw-r--r-- 1 psgendb psgendb  493 Jun 30 19:43 DeleteFiles.blmenu
-rw-r--r-- 1 psgendb psgendb  410 Jun 30 19:43 Export.blmenu
-rw-r--r-- 1 psgendb psgendb  863 Jul  1 10:33 GetFiles.blmenu
-rw-r--r-- 1 psgendb psgendb  936 Jun 30 19:43 Makelinks.blmenu
-rw-r--r-- 1 psgendb psgendb  500 Jun 30 19:45 NewRow.blmenu
-rw-r--r-- 1 psgendb psgendb  405 Jul  1 10:34 OpenDir.blmenu
-rw-r--r-- 1 psgendb psgendb  226 Jun 30 17:48 pcd_order
-rw-r--r-- 1 psgendb psgendb  376 Jun 30 19:45 Refresh.blmenu
-rw-r--r-- 1 psgendb psgendb 1326 Jun 30 19:46 ReName.blmenu
-rw-r--r-- 1 psgendb psgendb  900 Jun 30 19:46 SaveSel.blmenu
-rw-r--r-- 1 psgendb psgendb 1025 Jun 30 19:46 ShortNames.blmenu
-rw-r--r-- 1 psgendb psgendb  345 Jun 30 19:46 ViewFile.blmenu


All files with the .blmenu file extension are read as PCD files and inserted into BioLegato.

Similarly, the pcd_order directory specifies the vertical order of the functions in the dropdown menu

pcd_order
blfiles
Refresh.blmenu
OpenDir.blmenu
ViewFile.blmenu
Makelinks.blmenu
ShortNames.blmenu
ReName.blmenu
GetFiles.blmenu
ConcatFiles.blmenu
Compress.blmenu
Decompress.blmenu
DeleteFiles.blmenu
NewRow.blmenu
SaveSel.blmenu
Export.blmenu
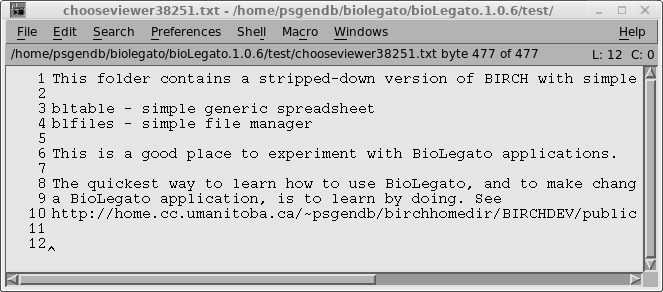


Note that Open, Properties and Exit are hard-coded into BioLegato, so those will always be found in the File menu.

The following examples illustrate the structure and syntax of blmenu files. For a full description, see the PCD Language Summary.

EXAMPLE: View file menu

The View file function is specified in ViewFile.blmenu.

name        "View file"
icon    "$BIRCH/dat/birch_black_ico.png"
tip    "View a file in the appropriate program, based on the file extension."
exec   "bltsv2name.py %in1% %in1%.tsv; FILE=`head -n 1 %in1%.tsv`; rm %in1%.tsv%; chooseviewer.py $FILE"

var "in1"
    type        tempfile
    direction   in
    format      tsv
    save        false


name - name to appear in the menu
icon - icon to appear in the menu
tip - tooltip
exec - command to be executed upon choosing this function

Recall that View File has no parameters, so we use an exec directive. The exec directive is for functions with no parameters. exec runs the command as soon as the item is chosen from the menu. As we'll see in the next example, most BioLegato functions have parameters, and include a Run button to launch the command after all parameters have been set.

var "in1" - This creates a temporary file with an arbitrary name. Wherever %in1% appears in the command, the name of that temporary file will be substituted into the command. Additional unique filenames can be built by using %in1% as part of the filename eg. %in1%.tsv. The direction field tells us that this file will be used as input for programs run by the shell. The format field tells BioLegato to export the data selected in the canvas to %in1% as a tab-separated value file. "save false" tells BioLegato that this file should be deleted after running the command.

Indentation matters!
As inspired by Python, PCD requires that a consistent level of indentation be used. Also as with Python never, never, never mix TABs and spaces. The best policy is the same one that most Python programmers use: Just use 4 columns of blank spaces for each level of indentation.

In order to get BioLegato to open the selected file in a viewer, a series of four commands are run:

bltsv2name.py %in1% %in1%.tsv - blfiles exports the contents of the blfiles canvas to a tab-separated value file called %in1%. The filename is the first field in that field. bltsv2name.py is a Python script that extracts the names in the first column into a new file called %in1%.tsv. This file should therefore have only 1 column, with each filename on a separate line.

FILE=`head -n 1 %in1%.tsv` - View file would probably be awkward if you could launch multiple files at once. Therefore, the decision was made to only open the top topmost file in the list. This command will set FILE to the first filename (ie. line 1) of %in1%.tsv.

rm %in1%.tsv% - Once we have the name of the file, we don't need the file list, so let's get rid of that now.

chooseviewer.py $FILE - chooseviewer.py is a Python script that opens a file with a viewer (eg. text editor, web browser, PDF viewer etc.) depending on the file extension. It is similar to 'open' on MacOSX. By default, chooseviewer.py makes a temporary copy of the file to open for viewing, and then deletes that temporary copy after a short delay.

EXAMPLE 2: Compress

The Compress function is specified in Compress.blmenu.


name        "Compress - compress files"
icon    "$BIRCH/dat/birch_black_ico.png"
tip    "Compress files, choosing compression method based on file extension eg. gz, zip, bz2, 7z"
      
var "in1"
    type        tempfile
    direction   in
    format      tsv
    save        false

var "ext"
    type        chooser
    label       "Compression file format?"
    default     0
    choices
        "Gzip (gz)" "gz"
        "Zip (zip)" "zip"
        "bzip2 (bz2)" "bz2"
        "p7zip (7z)" "7z"

var "out1"
    type        tempfile
    direction   out
    format      tsv
    save        false
    overwrite   true
    content     canvas

panel
    var "Run"
        type        button
        label       "Run"
        shell       "bltsv2name.py %in1% %in1%.tsv; bl_compress.sh %in1%.tsv %EXT%; bldirtab.py %out1%"
        close       true
    var "Manual"
        type        button
        label       "Manual"
        shell       "chooseviewer.py $BIRCH/doc/bioLegato/bl_compress.html"
        close       false


name, icon, tip and var "in1" are essentially the same as in Example 1.

ext - This creates a file chooser with one push button for each of the four choices. for each choice, the left field is a label for the button, and the right field is the value to be assigned to ext. Thus, if the Gzip button was selected, %EXT% in the shell command would be substituted with the value of ext, which is "gz".

out1 - This temporary file is output from the shell command, to replace (overwrite) the existing content of the canvas with the new list of files in the directory after the command has completed.

panel - panel tells BioLegato to group two or more items onto the same line. In this case there are two buttons, Run and Manual.

Run - The run button runs the command, and closes the menu once the shell command has been launched.

bltsv2name.py %in1% %in1%.tsv - as above

bl_compress.sh %in1%.tsv %EXT% - bl_compress.sh is a bash script that runs the appropriate compression command, based on the file extension specified in %EXT%.

bldirtab.py %out1% - bldirtab.py writes the current directory listing to %out1% in tab-separated value format. When the shell command is completed, BioLegato replaces the contents of the blfiles canvas with the new directory listing.

Manual button - Pressing Manual tells chooseviewer.py to open the file specified in the appropriate viewer.

5. Add a simple menu to blfiles to use grep

Next, we'll learn how to create new functions in an existing BioLegato application. Usually, this is done by making a copy of a menu similar to the one we want to make and modifying it.

Goal: To create a function in blfiles that uses the Unix grep command to find files containing strings matching a pattern.

While this could be done in the main $BIRCH/dat menu tree, it is often a good idea to prototype new functions in the $HOME/biolegato/bioLegato.1.0.6/test/local/dat directory tree, and then move it to the main $HOME/biolegato/bioLegato.1.0.6/test/dat directory once it is final.

We'll use as a template Makelinks.blmenu, which implements "Create symbolic links to files in another directory".  Copy $HOME/biolegato/bioLegato.1.0.6/test/dat/blfiles/PCD/File/Makelinks.blmenu to $HOME/biolegato/bioLegato.1.0.6/test/local/dat/blfiles/PCD/File. Any .blmenu file in this directory will automatically be added to blfiles.

cd $HOME/biolegato/bioLegato.1.0.6/test/dat/blfiles/PCD/File
cp -p Makelinks.blmenu $HOME/biolegato/bioLegato.1.0.6/test/local/dat/blfiles/PCD/File
cd $HOME/biolegato/bioLegato.1.0.6/test/dat/blfiles/PCD/File
ls -l


-rw-r--r-- 1 psgendb psgendb  936 Jun 30 19:43 Makelinks.blmenu


First, rename the file to Grep.blmenu. Now open Grep.blmenu in a text editor.

Let's give it a new name, and change the tooltip.

name        "grep - Search for files containing a pattern"
icon    "$BIRCH/dat/birch_black_ico.png"
tip    "runs the Unix grep command"


Open a separate terminal, and run blfiles from the $HOME/biolegato/bioLegato.1.0.6/test directory. Now launch blfiles. You should now see grep in the File menu.


At this point, the grep menu will do exactly the same thing as the Create symbolic links menu.


Now, let's think about what we want the function to do. For simplicity, let's assume that we want to find all files in the current working directory that contain lines matching a pattern. That would be something like "grep "pattern" * . This simplifies the problem since we won't need to export the current contents of blfiles to be used as input. If all we want to do with the output is to display the matching lines in a text editor, we won't need to read the output back into blfiles either.

That means we can get rid of the "sourcedir" and "out1" sections of Grep.blmenu. However, keep the "pattern" variable,

var "pattern"
    type        text
    label       "pattern to match"


since we're going to need it.

At this point, save the file, and restart blfiles from the command line. Now, the grep menu looks like this


Now we need to modify the shell command to make the function do what we want to do. In order to do that, we will need to save the output of grep in a temporary file that can be opened in a text editor. Below the pattern item, add the following:

var "in1"
    type        tempfile
    direction   in
    format      tsv
    save        false


This will create a temporary file called in1 with the contents of the canvas, which is not really what we want. However, this also allows to create other files based on the name of the temporary file. Since in1 will be automatically deleted after the command is run, we can ignore it, except to use it's name as part of the output filename.

The shell command can now be changed to

        shell       "grep '%PATTERN%' * > %in1%.tmp; chooseviewer.py %in1%.tmp; rm %in1%.tmp"

Save the menu file and quit out of blfiles. Since we need some files to test our new function, cd into the test/script directory, which has some Python scripts, shell scripts and Java .jar  files. Now launch blfiles (which happens to be in this directory).

Open up File --> grep.  As an example, let's search for files containing "python3".


The output should pop up in the text editor chosen by chooseviewer.py


The matching lines are all "shebang" lines at the beginning of Python scripts, telling the shell to run the script with python3.

6. Add additional features to the grep menu

Now that we have a working prototype, let's add a few features. As an example, we will add settings for two of the grep options: -v which prints lines that do NOT match the pattern, and -i which matches patterns in a case-insensitive way.

Experience shows that an incremental approach works best in building a BioLegato menu. Stated as an algorithm,

repeat
launch a new BioLegato window and test the menu
if not satisfactory
refine the menu based on the test
until menu item is satisfactory

To add  -v, add the following code to Grep.blmenu

var "invert"
    type        chooser
    label       "invert the sense of the match"
    default     1
    choices
        "Yes" "-v"
        "No" ""


In order to include this option in the command line, remember to insert a reference to the invert variable in the shell command.

        shell       "grep %INVERT% '%PATTERN%' * > %in1%.tmp; chooseviewer.py %in1%.tmp; rm %in1%.tmp"

Save the file, and restart blfiles. We can test it by searching for the word 'bash', which might be present in bash scripts.


the output shows lines containing 'bash'


Now, let's search for lines that do NOT contain 'bash'


Now, the output shows all lines from all files, except those 7 lines that contain 'bash'. (The scrollbar on the right shows that this is a very long list of lines.)


Finally, let's make the search case-insensitive.

var "ignore"
    type        chooser
    label       "ignore case"
    default     1
    choices
        "Yes" "-i"
        "No" ""

and

        shell       "grep %INVERT% %IGNORE% '%PATTERN%' * > %in1%.tmp; chooseviewer.py %in1%.tmp; rm %in1%.tmp"

Save the file, and reload blfiles. This time, search for 'BASH', using the ignore case option.


This returns exactly the same results as when we searched for 'bash'.


Finally, we need to change the Manual button to open the manual page for grep. We'll link to the manual page at man7.org.
We'll show this in context, to make the point that the Run and Manual buttons are both in the same panel. They are therefore indented with respect to the panel directive.

panel
    var "Run"
        type        button
        label       "Run"
        shell       "grep %INVERT% %IGNORE% '%PATTERN%' * > %in1%.tmp; chooseviewer.py %in1%.tmp; rm %in1%.tmp"
        close       true

    var "Manual"
        type        button
        label       "Manual"
        shell       "$BIRCH/script/chooseviewer.py https://man7.org/linux/man-pages/man1/grep.1.html"
        close       false


Save the file, restart blfiles and click on the Manual button. This should open up the man page in your web browser.

You might want to compare your Grep.blmenu file with the example found in Grep.blmenu.example.

What next?

The PCD language is simple, yet it can generate a diversity of complex menus, leading to the development of intuiitve, easy to use Graphic User Interfaces. For most things you want a menu to do, there is probably a menu in the BIRCH system that does it. By copying and modifying existing menus, you can quickly add new functions to any BioLegato application. For the more ambitious, you may have a use case for creating new BioLegato applications.

See the References at top for more in depth information on modifying and building BioLegato applications. Also see the BIRCH YouTube channel to get a better idea of how BioLegato applications can work in concert to empower the end user with versatile workflows.