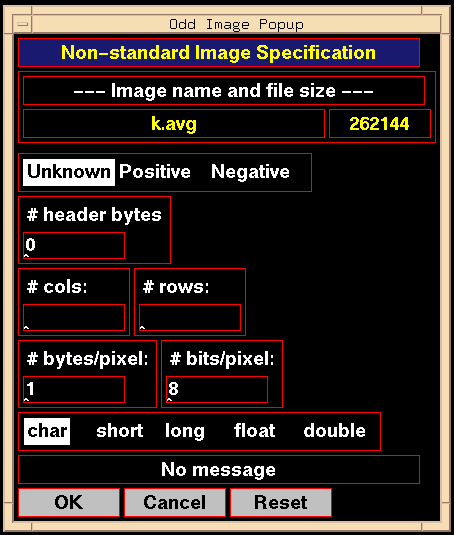
If you attempt to open an image as the primary image when it is not
an import file, you will be presented with an Odd Image Popup in
which you will describe your image using the buttons and text fields
in the popup. As of now, only "char" and "short" images are recognized.
Once you have clicked [OK] in this popup,
the program will create an import file which it will use for analysis.
Your original image will not be changed. The Odd Image Popup looks
like this:

Figure 5.9: Odd Image Popup
A top-to-bottom description of this popup follows:
- The file name appears to the upper left; the number of bytes to the
right. These fields cannot be changed.
- On the next line, you must specify whether the image is positive or
negative.
If the image is a directly-acquired gel image,
click [Positive] .
If the image is from an autoradiogram,
click [Negative] .
If left unknown, or if \fbox{Unknown} is clicked, you
will have to decide later.
- If the image has a header, enter the number of bytes. The program
assumes the header is entirely before the image data.
- On the next line, specify the number of columns and rows.
- On the next line, specify the bytes-per-pixel and bits-per-pixel.
- On the next line, click on the kind of image (char or byte, short, etc.).
- When all fields are properly set, click [OK] .
If the information provided makes sense to the program,
the popup disappears, an import file is created, and the
image displayed and ready for analysis.
If your description of the image doesn't match the number
of bytes in the file, a message is posted just above the
buttons along the bottom of the popup. Most often, the number
of bytes in the image doesn't match the description of
header bytes, rows and columns, bytes and bits per pixel.
- Clicking [Cancel] pops down the popup and returns control
to the Operations Submenu; no image is opened.
- Clicking [Reset] returns the popup to its default
state.
Backward to Chapter 5 outline
Backward to Chapter 5, section 5.5
Forward to Chapter 5, section 5.7
Table of Contents

